
How to Make a Fabric Christmas Tree: Step-by-Step Tutorial

See also other free patterns here ➡ 📲🧵🧶
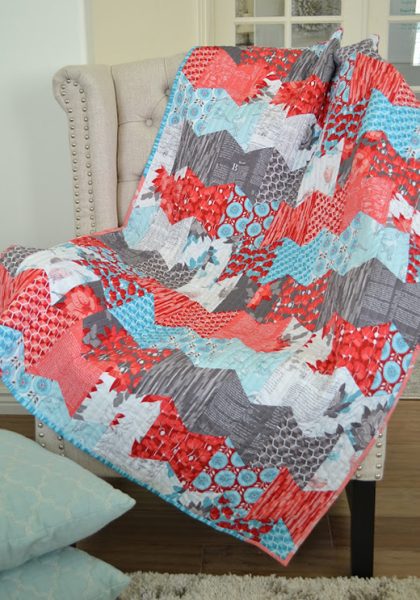
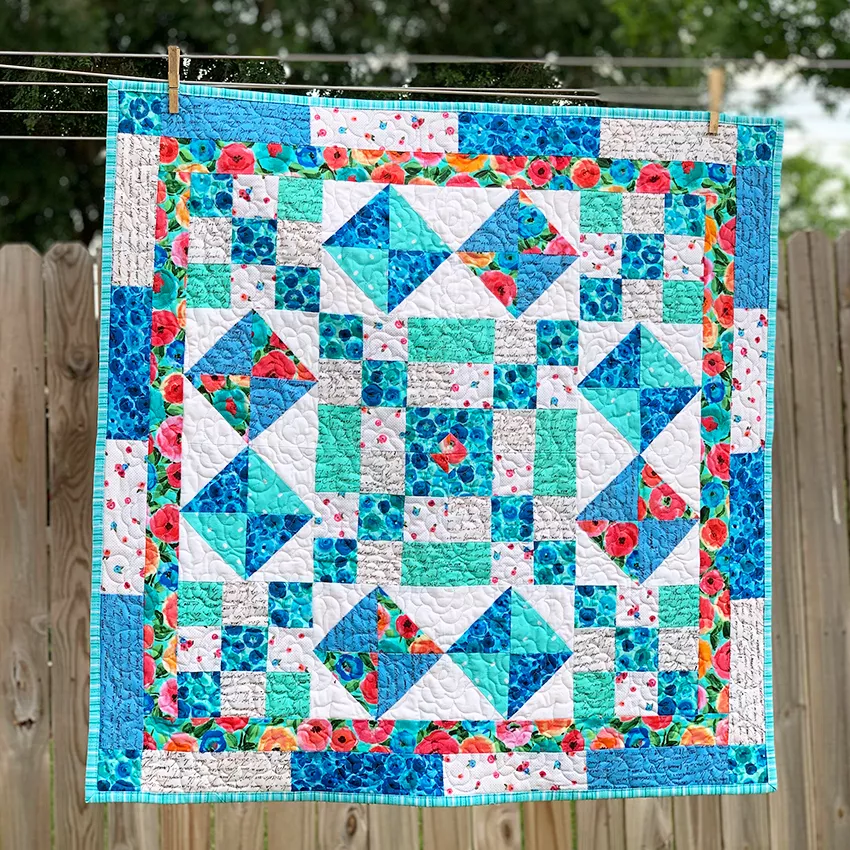
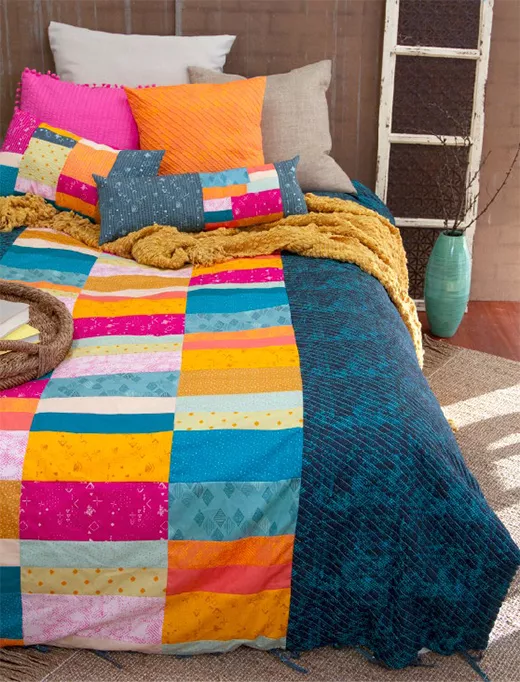
Patchwork quilts are true works of art that combine beauty, creativity, and comfort. Besides providing warmth, they decorate a space and bring that unique handmade charm. The quilt in the image, made with geometric cutouts in colors like red, blue, and gray, is a great example of how to combine fabrics to create a modern and vibrant design.
If you’ve always wanted to learn how to make a quilt for your bed or even as a gift for someone special, this step-by-step guide is for you. Here, I’ll teach you how to create a similar quilt, from choosing the fabrics to the final finishing touches.
Materials Needed
Before you begin, gather the following items:
100% cotton fabrics in different prints and colors (you can choose shades similar to those in the photo: red, blue, gray, and white, or adapt them to your preference).
Fabric scissors or a circular cutter with a cutting mat.
Patchwork ruler (helps you cut uniform blocks).
Sewing pins or clips.
Sewing machine (can be done by hand, but it will take longer).
Cotton thread in a neutral color.
Acrylic or cotton batting for stuffing.
Plain fabric for the lining.
Tape measure.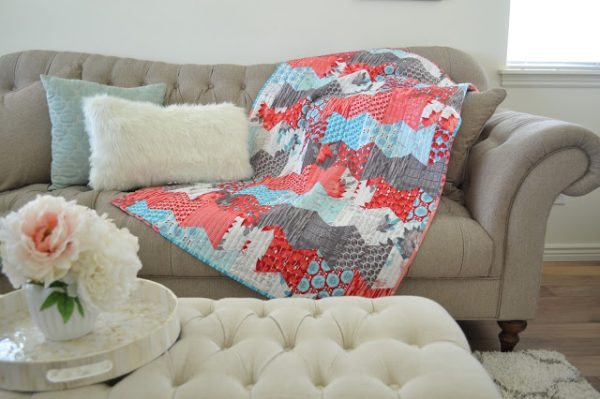
Iron.
Step 1 – Planning the Design
The first step is to define the style of your quilt. The quilt in the photo uses geometric blocks resembling half-hexagons joined in rows, creating a modern and dynamic effect.
Tips:
Choose 3 to 5 main colors for a harmonious composition.
Combine patterned fabrics with solids for balance.
Sketch on paper to visualize how the colors alternate.
Step 2 – Cutting the Blocks
This pattern is made with half-hexagon blocks. To cut, follow these steps:
Cut strips of fabric 6 to 8 inches wide.
Use the patchwork ruler to cut the blocks into trapezoid/hexagon shapes cut in half.
Make sure all the blocks are the same size for easier sewing.
If you prefer, you can print out templates on paper and use them as a guide.
Step 3 – Assembling the Blocks
Now it’s time to start assembling the quilt.
Choose a large surface (like a table or even the floor) to arrange the blocks.
Switch between colors and patterns to create contrast and movement, as in the quilt pictured.
Arrange the pieces in horizontal rows. Each row should have blocks fitted together like a zigzag pattern.
Tip: Take a photo of the layout before sewing so you can follow it as a guide.
Step 4 – Sewing the Rows
With the blocks already arranged:
Take two blocks from the first row and sew them together straight, right sides together.
Continue joining until the row is complete.
Iron the seams to press the edges open.
Repeat the process for all rows.
Then, join the rows together, always aligning the seams to maintain a uniform design.
Step 5 – Assembling the “Sandwich”
The quilt consists of three layers:
Lining (back): Lay the plain fabric flat on the floor or table.
Bat (middle): Place the acrylic batting on top.
Top (front): Position the assembled patchwork.
Keep everything taut and use pins or paper clips to secure the three layers.
Step 6 – Quilting
Quilting is the process of sewing the three layers together.
You can sew straight lines following the geometric design of the quilt, which creates a modern finish.
If you’re more experienced, you can sew free-flowing stitches to create designs.
Always start from the center of the quilt and work your way out to the edges to prevent puckering.
Step 7 – Finishing the Edges
Now it’s time to finish:
Cut strips of fabric approximately 6 cm wide for the bias binding.
Sew the strips together until they are long enough to wrap around the entire quilt.
Sew the bias binding around the quilt, folding the ends inward and finishing.
Step 8 – Final Check
Iron the quilt again at the appropriate temperature.
Make sure all seams are secure.
Take out any loose threads.
Now your quilt is ready to use or give as a gift!
Extra Tips
If you’re a beginner, start with a smaller quilt (like a sofa throw) before making a bed quilt.
Invest in good-quality fabrics, as they make your work more beautiful and durable.
Personalize your quilt: you can embroider initials, add labels, or play with different fabric textures.
See also other free patterns here ➡ 📲🧵🧶
Conclusion
Making a patchwork quilt is a creative and enjoyable experience. Besides being a functional piece, it’s also a way to express your personality through the colors and patterns you choose. The model pictured, with colorful geometric blocks, is perfect for those who want a modern and cheerful look in their bedroom.
With patience and dedication, you can create unique quilts that will fill your home with warmth and style. And best of all: each handmade piece carries a special story, becoming not only a decorative item but also a cherished keepsake that can be passed down from generation to generation.
