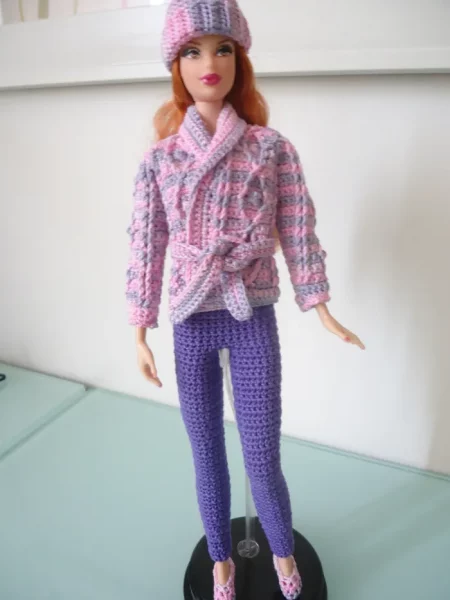
Crocheting Barbie Basic Leggings: A Step-by-Step Guide for a Stylish and Comfortable Fit
Barbie dolls have always been known for their wide range of fashionable outfits, from glamorous gowns to casual everyday wear. One of the most versatile and essential items in Barbie’s wardrobe is a pair of basic leggings. Perfect for lounging, playing sports, or pairing with various tops, crocheted leggings provide Barbie with comfortable and stylish options. Whether you’re an experienced crocheter or just starting out, this guide will help you create the perfect pair of leggings for Barbie with a step-by-step tutorial.
Why Crochet Barbie Basic Leggings?
- Custom Fit: Crocheting allows you to create leggings that fit Barbie perfectly, making them more tailored than store-bought options.
- Creative Freedom: You can choose your favorite yarn colors, add embellishments, and adjust the length or style to create unique leggings that reflect your personal taste.
- Skill-Building: Crocheting leggings helps improve your crochet skills, especially when working with small details and techniques such as ribbing and stretchable stitches.
- Affordable Fashion: Creating your own Barbie clothing can save money and offers the satisfaction of making something with your own hands.
Materials You’ll Need:
- Yarn: Choose a lightweight yarn such as sport weight or DK (double knitting) yarn. Acrylic or cotton yarn is a good choice as it provides the right balance of stretch and durability.
- Crochet Hook: Use a hook size between 1.5mm (size 7) and 2.5mm (size B/1) for small stitches that create a snug fit.
- Measuring Tape: Essential for accurate sizing to ensure the leggings fit Barbie’s waist and hips.
- Scissors: For cutting the yarn.
- Yarn Needle: For weaving in the ends once you’re finished.
- Stitch Markers (optional): To keep track of your rounds and stitch count.
- Elastic Band (optional): To help maintain the shape of the waistband.
Step-by-Step Guide to Crochet Basic Leggings for Barbie:
Step 1: Measure and Create the Foundation Chain
- Measure Barbie’s Waist and Hips: Use a measuring tape to measure Barbie’s waist and hip circumference to ensure the leggings will fit well.
- Foundation Chain: Chain a number of stitches that matches Barbie’s waist measurement. This will form the base for the leggings’ waistband.
Step 2: Create the Waistband
- Row 1: Start by single crocheting (sc) in the second chain from the hook and continue across. Turn your work at the end of the row.
- Rows 2-4: Continue single crocheting or use half double crochet (hdc) stitches for a stretchier waistband. Repeat until the waistband is about 1-2 rows thick or to your desired width.
- Optional Elastic Band: To make the waistband more secure, thread a thin elastic band through the top of the waistband and sew it in place.
Step 3: Form the Leggings’ Legs
- Join the Ends: Bring the ends of the waistband together and join them using a slip stitch to create a circular piece.
- Round 1: Begin crocheting around the edge using single crochet stitches. Place stitch markers if needed to track your rounds.
- Increase Stitches for the Hips: To create a slight flare for the hips, increase the number of stitches evenly in the first few rounds. This will help the leggings fit Barbie’s body smoothly.
- Continue Crocheting: Continue in single crochet or half double crochet, working in the round until you reach the desired length for the leggings. Make sure to check the fit on Barbie as you go to ensure the leggings are neither too tight nor too loose.
Step 4: Shape the Ankles
- Decrease Stitches: Once you reach the desired length for the main part of the leggings, decrease stitches by crocheting two stitches together (sc2tog) every few stitches to create a tapered look that fits snugly around Barbie’s ankles.
- Finish the Ankles: Continue decreasing until the leggings fit comfortably around Barbie’s ankles. You can add a small row of single crochet or a decorative border to finish the ankle openings.
Step 5: Finishing Touches
- Weave in Ends: Use a yarn needle to weave in any loose yarn ends securely.
- Optional Ribbing: If you’d like to add a ribbed effect to the leggings, use a slip stitch or front post double crochet (FPdc) around the ankle and waistband for extra detail.
- Final Fit Check: Place the leggings on Barbie and make any minor adjustments to ensure they fit snugly and comfortably.
Customization Ideas:
- Color Blocking: Use different yarn colors to create color-blocked leggings for a trendy look.
- Embroidery: Add small embroidered patterns, like stars or hearts, for a personalized touch.
- Textured Stitches: Use textured stitches such as popcorn or shell stitches to create unique patterns along the sides of the leggings.
- Decorative Edges: Add lace or decorative picot edging at the ankle for a feminine finish.
Troubleshooting and Tips:
- Too Loose or Tight?: If the leggings are too tight, increase the number of stitches in the foundation chain or add more rounds to the main body. If they are too loose, consider using a smaller hook size or reducing the stitch count.
- Stretch and Comfort: If you want the leggings to have more stretch, use half double crochet or a combination of stitches for flexibility.
- Choosing the Right Yarn: Opt for yarn that has a bit of stretch or a blend with elastic fibers to help the leggings hold their shape.
Conclusion
Crocheting basic leggings for Barbie is a rewarding project that enhances your doll’s wardrobe with comfortable, stylish, and custom-made clothing. With the right materials, careful measurements, and a few creative touches, you can make leggings that fit Barbie perfectly and suit any occasion. Whether you make them as a casual look or add embellishments for extra style, crocheted leggings are a must-have item that showcases your crochet skills and adds a personal touch to Barbie’s outfits. Happy crocheting!
FREE PATTERN HERE

Compartilhe com os amigos

