Crochet a Barbie Sparkle Dress & Accessories: Free Pattern Guide
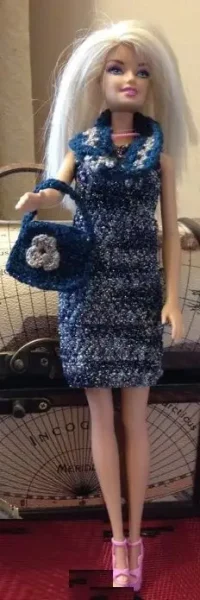
Barbie deserves to shine, and what better way to make her sparkle than with a custom crocheted dress and matching accessories? This guide will walk you through creating a glamorous Barbie sparkle dress complete with stylish details to make her stand out. With a bit of creativity, you can customize this pattern to reflect Barbie’s unique style and make her ready for any special event or occasion.
Why Crochet a Barbie Sparkle Dress and Accessories?
- Standout Fashion: This project lets Barbie sparkle and shine, perfect for parties, celebrations, or simply adding to her fashion repertoire.
- Fun and Creative: Play with different colors, yarn types, and embellishments to make the dress truly yours.
- Gift Idea: Handmade items are always thoughtful gifts, especially for young children who love to dress up their dolls.
- Skill Enhancement: Practice your crochet skills while creating something stylish and rewarding.
Materials You’ll Need:
- Yarn: Lightweight yarn (sport weight or DK) in a shiny or sparkly finish, such as metallic thread, sequined yarn, or a yarn with glitter for extra shimmer.
- Crochet Hook: A small hook, typically between 2mm and 3mm (sizes B/1 to C/2).
- Scissors: For cutting the yarn when finished.
- Yarn Needle: For weaving in the ends and sewing on embellishments.
- Measuring Tape: To take Barbie’s measurements for a perfect fit.
- Stitch Markers (optional): To keep track of rounds or stitch placement.
- Embellishments: Small beads, sequins, or tiny crochet flowers for added sparkle and detail.
- Glue (optional): For attaching small embellishments securely.
Part 1: Crocheting the Sparkle Dress
Step 1: Measure Barbie’s Bust and Waist
- Use a measuring tape to measure Barbie’s bust and waist to ensure a good fit.
Step 2: Create the Foundation Chain
- Chain a number of stitches that matches Barbie’s bust measurement, adding a few extra stitches for comfort. Join the chain with a slip stitch to form a circle, being careful not to twist it.
Step 3: Crochet the Bodice
- Round 1: Chain 3 (counts as the first double crochet) and work double crochet (dc) stitches around the foundation chain. Join with a slip stitch at the top of the chain-3 to close the round.
- Increasing for Fit: Increase by working 2 dc stitches in every 4th stitch, or adjust as needed for Barbie’s measurements to create a snug fit.
- Length of the Bodice: Continue crocheting until the bodice reaches just above Barbie’s waist or to your desired length. For added elegance, work a row of picot stitches or scalloped edges along the neckline.
Part 2: Creating the Skirt
Step 1: Start the Skirt
- Begin working in the round from the bottom edge of the bodice. Use a shiny or sparkly yarn for the skirt to create that glamorous look.
- Round 1: Work dc or hdc (half double crochet) stitches around, making sure to keep the stitches even.
Step 2: Add Flare to the Skirt
- Increase the skirt’s width by working 2 dc or hdc stitches into every 5th or 6th stitch, depending on the desired fullness.
- Continue working in the round until the skirt reaches the desired length, whether knee-length, midi, or full length for an evening gown effect.
Step 3: Decorative Hem
- To add extra sparkle, create a decorative hem by working a row of shell stitches or a picot edge.
- Embellishments: Attach small sequins or beads to the hem using a yarn needle or a small dot of glue to add extra shimmer.
Part 3: Creating the Accessories
Step 1: Crochet a Matching Headband
- Chain a length that fits around Barbie’s head. Join with a slip stitch to form a circle.
- Work single crochet (sc) stitches or half double crochet (hdc) stitches in rounds until the headband is the desired width.
- Add embellishments such as a small crocheted flower, beads, or sequins to make the headband sparkle.
Step 2: Crochet a Tiny Purse or Clutch
- Chain a small number of stitches and work rows of sc stitches to create a compact shape. Fold and stitch the sides together.
- Add a button, snap, or small chain to create a handle or clasp for Barbie’s purse.
- Decorate the purse with sequins or a tiny crocheted flower for extra style.
Part 4: Finishing Touches
Step 1: Weave in Loose Ends
- Use a yarn needle to weave in any loose ends securely, ensuring they are hidden within the stitches.
Step 2: Attach Accessories
- Carefully place the headband and purse on Barbie to complete her look. Adjust any straps or embellishments to make sure they fit and stay in place.
Step 3: Final Try-On
- Dress Barbie and check the fit. Adjust any parts of the dress or accessories as needed.
Customization and Styling Tips:
- Color Variations: Experiment with metallic, sparkly, or variegated yarns for the bodice and skirt for a unique look.
- Textured Stitches: Use textured stitches like shells or fan stitches in the skirt for added depth and visual interest.
- Embellishments: Add more beads, sequins, or a touch of glitter to the bodice or skirt for extra glamour.
- Matching Set: Consider crocheting matching gloves or shoes for a complete, cohesive outfit.
Troubleshooting and Tips:
- Fit Adjustments: If the bodice or skirt is too tight or loose, adjust the number of stitches in the foundation chain or modify the number of increases.
- Secure Embellishments: Use a small amount of glue to keep beads or sequins in place if sewing them on is not secure enough.
- Even Stitching: Be consistent with your stitch size for a polished and professional-looking result.
Conclusion
Crocheting a Barbie sparkle dress with matching accessories is a fun and creative project that can make your doll feel glamorous and ready for any special occasion. With a few simple steps, you can create a stunning outfit that stands out. Customize the pattern with your favorite yarns and embellishments to make Barbie’s wardrobe even more fabulous. Enjoy the process, experiment with different styles, and have fun creating a sparkling ensemble for your favorite doll!
FREE PATTERN HERE

Compartilhe com os amigos

