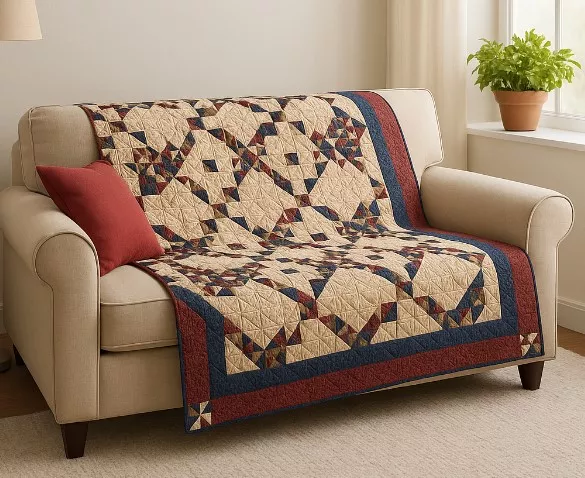
The quilt in the photo has a classic look: stars with “chains” crossing the top and red and navy borders. Below is a complete guide for you to reproduce the same effect using standard patchwork measurements.
Overview
Pattern: Star with 4-patch corners + Chain Block (alternating).
Blocks: 12″ finished (30.5 cm).
Layout: 4 × 5 blocks (20 blocks).
Top size without borders: 48″ × 60″ (122 × 152 cm).
Borders: 1½” red + 2″ navy + 4″ red (finished).
Approx. final size: 63″ × 75″ (160 × 191 cm).
Tip: 1″ = 2.54 cm. Use ¼” (0.6 cm) seam allowance throughout.

Materials (for the size above)
Background (beige/cream): ~ 2.75–3.0 m (3 yd).
Red for chains/border: ~ 1.15 m (1¼ yd).
Navy for chains/border: ~ 1.15 m (1¼ yd).
Extra red/blue scraps (or use the same fabrics) to vary the star points: ~ 0.7 m total (¾ yd).
Binding: 2½” × 7 WOF strips (~ 0.6 m / ⅝ yd).
Backing: 170 × 200 cm (or 2.1–2.3 m of 280 cm-wide fabric; if using 110 cm, allow ~ 3.7 m / 4 yd to piece).
Batting, thread, ruler, rotary cutter, and cutting mat.
Block Design
You’ll make two types of 12″ blocks:
Block A – Star with 4-patch corners (10 units)
Block components (unfinished measurements):
Center (background): 1 square 6½” (16.5 cm).
Star points (Flying Geese 3½” × 6½”) – use the “no-waste” method:
• For each set of 4 geese: 1 colored square 7¼” (18.4 cm) + 4 background squares 3⅞” (9.8 cm).
• For 10 blocks you’ll need 10 colored 7¼” squares and 40 background 3⅞” squares.
Corner 4-patch units (finish at 3″): 4 per block (see below).
Block B – Chain (10 units)
Built on a 3 × 3 grid (each unit finishes at 3″):
Five 4-patch units (one in the center and four in the corners).
Four background squares 3½” (8.9 cm) for the sides’ centers.
How to Make the 4-patch Units (you need 90 total)
Cut 2″ strips: 9 background + 9 dark (red/blue).
Sew one background strip to one dark strip; press seams toward the dark.
Cut into 2″ segments.
Join two segments, alternating colors, to form a 3½” 4-patch (finishes at 3″).
Yields ~10 units per WOF strip set.
Cutting Summary
Background:
10 squares 6½” (centers of Block A)
40 squares 3⅞” (Flying Geese)
40 squares 3½” (Block B)
9 strips 2″ WOF (for 4-patches)
Red/Navy (mix for a “scrappy” effect):
10 squares 7¼” (Flying Geese)
9 strips 2″ WOF (for 4-patches)
Borders:
Red: 4 strips 2″ WOF (inner border) and 4 strips 4½” WOF (outer border)
Navy: 4 strips 2½” WOF (middle border)
Binding: 2½” WOF strips totaling ~ 250″ (6.4 m).
Assembly – Step by Step
Flying Geese (star points)
For each 7¼” colored square, place two 3⅞” background squares on opposite corners, right sides together. Draw diagonal lines, sew ¼” on both sides of the line, cut apart.
Press, then add the third background square to each unit, repeat, cut, press. Trim to 3½” × 6½”. Each set yields 4 geese.
Make the 4-patches
Follow the strip method above and assemble 90 units (3½”).
Make half red-dominant and half blue-dominant for a balanced chain effect.
Assemble Block A (Star)
On a 3 × 3 grid:
Row 1: 4-patch | goose (point outward) | 4-patch
Row 2: goose (point outward) | 6½” center | goose
Row 3: 4-patch | goose | 4-patch
Join rows, then rows together. Trim block to 12½”.
Assemble Block B (Chain)
On a 3 × 3 grid:
Row 1: 4-patch | 3½” background square | 4-patch
Row 2: background square | center 4-patch | background square
Row 3: 4-patch | background square | 4-patch
Join and trim to 12½”.
Layout
Arrange in a 4 × 5 layout, alternating A and B, starting with A in the top left (A-B-A-B / B-A-B-A …).
Rotate some star blocks so red/blue points balance visually.
Join the Top
Sew blocks into rows, press seams in opposite directions.
Join rows together. The top should measure ~ 48½” × 60½”.
Borders (as in the photo: red/navy/red)
Border 1 (red 1½”): cut/join 2″ strips. Measure top, cut to size, sew sides first, then top/bottom.
Border 2 (navy 2″): cut 2½” strips, repeat process.
Border 3 (red 4″): cut 4½” strips.
Optional (like in the photo): make pinwheel cornerstones for the last border using 4 HSTs (cut 5″ red/blue squares, make HSTs, trim to 4½”).
Quilting
Simple and elegant: straight-line quilting with walking foot, diagonal grid every 2–3″ (5–7.5 cm), or echoing the star outlines.
Baste (backing + batting + top), quilt, and trim.
Binding
Join 2½” strips, fold in half lengthwise, press, and attach around the quilt front; fold to the back and hand-stitch (or machine finish).
Wash and dry for that soft quilted texture.
Tips to Match the Photo
Palette: sandy beige background + brick red + navy. Add variations of these tones in 4-patches and star points for a “controlled scrappy” look.
Contrast: choose a solid, subtle background to make stars and chains pop.
Seam pressing: always toward the dark; when joining blocks, nest seams for perfect points.
Accuracy: check and trim each unit (3½”, 6½”, 12½”) before assembling.