Snowed In Beanie – Free Crochet Pattern

Advertising

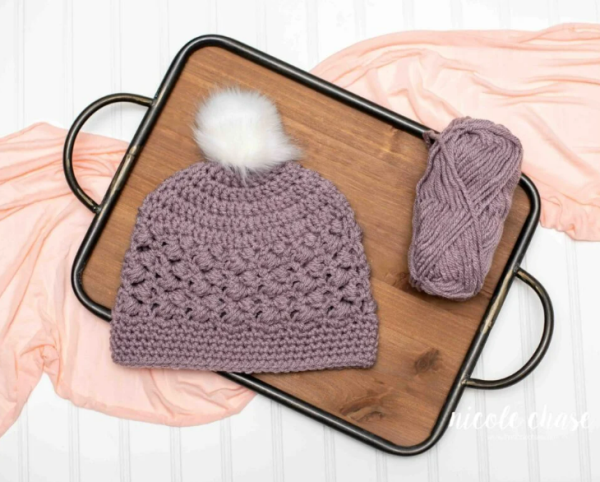
Here is the Snowed In Beanie free crochet pattern! This cozy beanie is perfect for winter weather, featuring a textured stitch pattern that gives it a lovely, warm, and stylish look. Whether you wear it on a chilly winter day or give it as a gift, it’s sure to be a favorite!

Materials:

Abbreviations:

Gauge:


Pattern:

Step 1: Starting the Beanie

  1. Ch 3, join with a sl st to form a ring.
  2. Round 1: Ch 2 (counts as the first hdc), and work 9 hdc into the ring. Join with a sl st to the top of the beginning ch-2. (10 hdc)
  3. Round 2: Ch 2, inc in each stitch around. Join with a sl st to the top of the beginning ch-2. (20 hdc)
  4. Round 3: Ch 2, (hdc in next stitch, inc in next stitch) around. Join with a sl st to the top of the beginning ch-2. (30 hdc)
  5. Round 4: Ch 2, (hdc in next 2 stitches, inc in next stitch) around. Join with a sl st to the top of the beginning ch-2. (40 hdc)

Step 2: Begin the Textured Pattern

  1. Round 5: Ch 2, (fpdc around next stitch, bpdc around next stitch) around. Join with a sl st to the top of the beginning ch-2. (40 stitches)
  2. Round 6: Ch 2, (fpdc around next stitch, bpdc around next stitch) around. Join with a sl st to the top of the beginning ch-2. (40 stitches)
    • Continue rounds 5 and 6 for a couple more rounds, or until the hat measures about 6-7 inches from the starting round, depending on the desired length.

Step 3: Begin Decreasing to Shape the Top of the Hat

  1. Round 7: Ch 2, (hdc in next 3 stitches, dec) around. Join with a sl st to the top of the beginning ch-2. (32 hdc)
  2. Round 8: Ch 2, (hdc in next 2 stitches, dec) around. Join with a sl st to the top of the beginning ch-2. (24 hdc)
  3. Round 9: Ch 2, (hdc in next stitch, dec) around. Join with a sl st to the top of the beginning ch-2. (16 hdc)
  4. Round 10: Ch 2, dec around. Join with a sl st to the top of the beginning ch-2. (8 hdc)

Step 4: Finish the Beanie

  1. Round 11: Ch 1, sc in each stitch around. Join with a sl st to the beginning sc. (8 sc)
  2. FO: Cut the yarn, leaving a long tail. Use a tapestry needle to weave in the end and close up the top of the beanie.

Step 5: Optional Pom-Pom


Final Touches:

Your Snowed In Beanie is now complete and ready to wear! Stay cozy and stylish with this fun and functional beanie, perfect for winter weather. Enjoy crocheting!

  FREE PATTERN HERE

Advertising