The art of stained glass dates back centuries, adorning windows of cathedrals and historic buildings with a magnificent display of color and light.
The intricate combination of colored glass results in dazzling patterns that uniquely filter light.
Inspired by this timeless beauty, artisans and craft enthusiasts have been exploring ways to incorporate stained glass aesthetics into various forms of artistic expression.
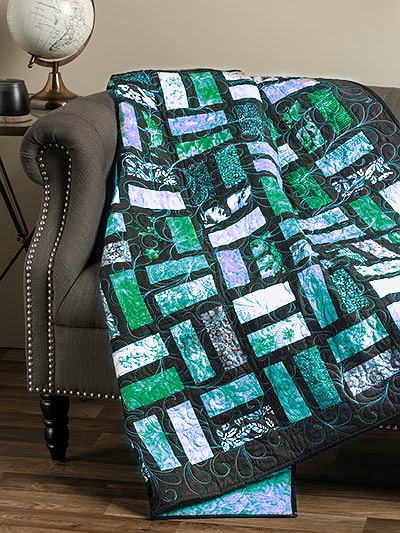
A captivating example is the creation of stained glass quilts, where the vibrant color palette and intricate patterns are reimagined in fabric.
In this article, we’re going to explore the fascinating approach of creating a “Stained Glass Quilt” using a free pattern.
Let’s dive into the steps of the creative process, from selecting colors to assembling the quilt.
In addition, we’ll examine the intersection between stained glass tradition and quilt art, highlighting how this fusion results in a stunning final piece.
The Free Standard and Required Materials
The first step in creating the Stained Glass Quilt is to acquire a suitable pattern. Fortunately, the digital age has made it easy to access a wide range of free patterns, allowing you to choose the one that most resonates with your creative vision.
When looking for a pattern, make sure it fits the size of the quilt you are planning to make.
Materials needed for this project include:
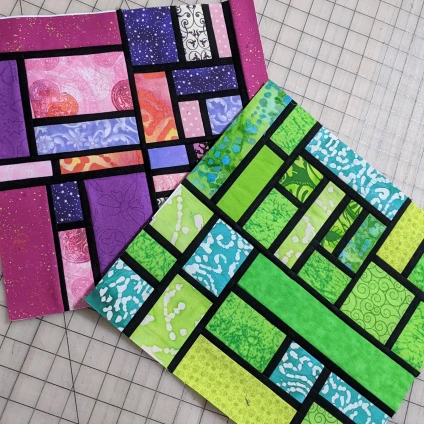
Colored Fabrics: As with stained glass, the choice of colors is crucial. Opt for a variety of fabrics in vibrant, contrasting hues, similar to the colored glass used in real stained glass.
Printed Pattern: Print the chosen pattern on paper for reference during the assembly process.
Background Fabric: Choose a solid fabric to serve as a backdrop, highlighting the “stained glass” patterns.
Sewing Machine and Threads: A reliable sewing machine and threads corresponding to the chosen fabrics.
Scissors and Pins: For cutting fabric and temporarily securing it in place.
Quilted Blanket: Choose a blanket that will provide volume and comfort to the quilt.
Quilting Thread: A thicker thread for the quilting process.
Selection of Colors and Styles
Color selection plays a central role in creating a stunning Stained Glass Quilt.
Just as traditional stained glass windows feature a variety of hues to create a dramatic interaction with light, quilt fabrics also need to be chosen carefully.
When choosing colors, think about the overall harmony you want to achieve. You can opt for a warm, bold color palette for a vibrant effect, or choose softer tones for a more laid-back, serene approach.
Keep in mind that contrasts between fabrics will bring out details in the pattern, so make sure there is a variety of shades in your selection.
In addition to colors, consider the style of the pattern. Some stained glass patterns are more geometric, while others are more organic.
Choose a pattern that resonates with your artistic sensibility and aligns with the decor style of the room where the quilt will be displayed.
Assembly of the Stained Glass Quilt
With the materials gathered and the colors selected, it’s time to start assembling the Stained Glass Quilt. Follow these steps to create a truly unique piece:
Cutting the Fabrics: Use the printed pattern as a guide to cut the colored fabrics into shapes that correspond to the different elements of the pattern. Remember to leave a seam allowance when cutting.
Organization and Arrangement: Arrange the cut fabric pieces on top of the background fabric.
This will allow you to visualize how the “stained glass” elements will fit together in the finished quilt. Make adjustments as needed to ensure a balanced arrangement.
Temporary Attachment: Use safety pins to temporarily secure the fabric pieces in place. This will keep them from moving during the sewing process.
Sewing the Elements: Using the sewing machine and matching threads, sew the fabric elements in place, following the printed pattern as a reference.
Quilting: With the stained glass elements sewn together, place the quilt and backing fabric together. Use the quilting process to bring the layers together and add texture to the quilt.
The Fusion of Traditions: Stained Glass and Quilt
The creation of the Stained Glass Quilt is not only a creative exploration, but also a celebration of the fusion of two distinct artistic traditions: stained glass and the quilt. Both forms of expression have deep roots in history and carry symbolic meanings.
Stained glass, with its colors that transform light into visual narratives, has historically been used to convey religious and mythological stories.
It also evokes a sense of spiritual elevation and transcendental beauty. By bringing this aesthetic into the cozy world of quilts, a whole new dimension of meaning is added.
The quilt, often associated with comfort, warmth and family, embodies the welcoming energy of home in the stained glass representation.
This fusion creates a piece that is not only visually captivating, but also loaded with meaning.
The Stained Glass Quilt becomes a unique interpretation of tradition, reminding us of the interconnection between different art forms and the way they can influence each other.
Creating a Stained Glass Quilt using a free pattern is an exciting and creative journey that combines the beauty of stained glass with the art of quilting.
By carefully choosing colors, patterns, and materials, you can create a one-of-a-kind piece that celebrates both the aesthetic of stained glass and the cozy tradition of quilting.
Remember that each stitch is an expression of your creativity and passion, and the finished quilt will be a lasting reminder of your artistic skill and dedication.
So dive into this artistic adventure and create a Stained Glass Quilt that will leave a lasting mark on your creative journey.


