Patchwork Quilt and Pillows: The Stars of Decor
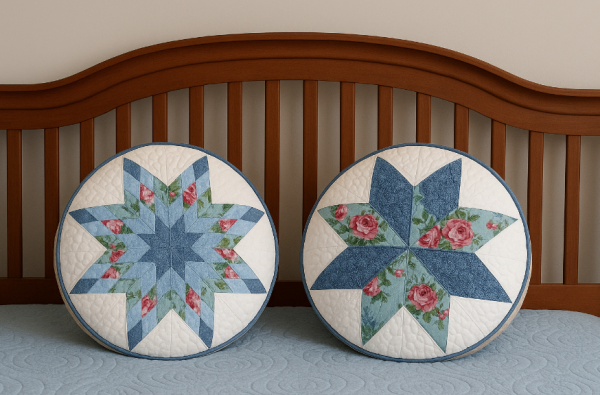
The pillows in the image feature two variations of an eight-pointed star in shades of blue with florals: a diamond-shaped star (Lone Star) and a petal-shaped star (Kites). Below, you’ll learn how to make two coordinating round pillows and a quilt from scratch with the same blocks: materials, cutting, sewing, quilting, and finishing. This guide is designed for those who already use a home sewing machine and a patchwork ruler, but is also suitable for cautious beginners.
Materials
Fabrics (100% cotton):
Background (off-white or ecru): 1.5 m for pillows + quilt blocks.
Jeans/medium blue star: 0.6 m.
Floral star (roses/leaves): 0.6 m.
Bias (blue): 0.7 m.
For the cushions (Ø 45 cm each):
R1/R2 acrylic or cotton batting: 1 m.
Simple lining: 1 m.
Two 40 cm zippers or envelope closure.
Circular filling (45 cm) or silicone fiberfill.
Optional: Binding cord (4 m total) + bias binding.
For the quilt (approx. 2.20 m × 2.40 m):
Finished blanket.
Lining (seams according to fabric width).
Finishing bias binding: ~12 m ready-made (or 40 cm of fabric to make the continuous bias binding).
Full and Free Pattern Click Here
Tools:
Sewing machine with straight stitch, 1/4″ foot (or guide setting).
Cutting mat, rotary cutter, patchwork ruler (with 45° and 60° markings).
Fine pins, paper clips, pen/friction, scissors, steam iron.
45° diamond and kite template (can be made on cardstock using the ruler).
General patterns and measurements:
Seam allowance: 0.75 cm (1/4″).
Iron each open seam or to one side.
Pre-wash and iron the fabrics to prevent shrinkage and color bleeding.
Set Planning
We will make:
Pillow A – Lone Star (gradient diamonds).
Pillow B – Petal star (kites), alternating blue and floral.
Quilt – 40 cm square blocks with the star of your choice (or alternate between two), joined by sashing and borders.
Tip: Choose 3 to 4 shades of blue (light/medium/dark) plus florals to add depth to the star.
Pillow A – Lone Star (diamonds)
1) Strip-Picing
This technique speeds up the star without cutting individual diamonds.
Cut 4 cm wide strips from light blue, medium blue, dark blue, and floral fabrics (at least 4 strips of each color, 50 cm long).
Assemble strips by sewing the strips together in the desired order (e.g., light–floral–medium–floral–dark). Make four identical sets.
Press the seams to the same side.
Position the ruler at a 45° angle and cut 4 cm diamond segments (the width of the strip). You’ll get diagonal “bars” with stripes.
2) Assembling the Points
For each point of the star, you need four striped diamonds.
Join two diamonds to form a “V” (the stripes should line up). Repeat to form four “Vs.”
Join the “Vs” in pairs, then join the four together to form an eight-pointed star.
Pay attention to the center meeting: align the seams with a perpendicular pin and sew slowly; if necessary, undo 2–3 center stitches and finish by hand to make it flat.
3) Completing the Background Circle/Square
To transform the star into an 18-inch round block:
Cut isosceles triangles from the background fabric to fill the gaps between the points, forming a ~38–40 cm square.
Join the triangles at the points, pressing without distorting.
Place the square on the blanket and sandwich lining, pin, and quilt: echo the star seams and wide curves on the bottom.
Draw an 18-inch circle using a large plate/compass and cut out the front of the pillow.
Pillow B – Kite Star
1) Templates and Cutting
Draw a kite 8 inches long and 4 inches at the base. Tip: Add a 45° angle at the top for the center slot.
Cut 8 blue kites and 8 floral kites.
Cut 8 triangles for the bottom to fit between the petals (4-inch bases).
2) Assembly
Join a blue kite to a floral kite along the long side; make 8 pairs.
Join the pairs to form an octagon. The center closes like a rosette.
Insert the base triangles between the kites to “open” the shape until it becomes a ~38–40 cm square.
Make the sandwich with batting and lining and quilt (lines radiating from the center, like rays).
Trace and cut out the 18-inch circle.
Back, Closure, and Assembling the Pillows
Zipper Option
Cut two 18-inch circles from the base fabric (one for each cover).
Open one of the circles with a straight 16-inch cut, apply the zipper, and close.
Ironing (optional): Cover the cord with bias binding and pin it around the front of the pillow, right sides together.
Join the front and back, right sides together, sewing all around (topstitching over the open zipper).
Trim, pinch the seam allowance every 2 cm, turn it out, and stuff.
Envelope option (without zipper)
Make two rectangular half-backs measuring 47 × 32 cm, with folds turned inward by 2.5 cm.
Overlap them to form an envelope, pin behind the 47 cm circle, and sew as in the previous step.
Finishing: Lightly iron the pillow (without using a hot iron directly on the fiber), press the seams, and shape the circle with your hands.
Quilt with Star Blocks
1) Size and Composition
Blocks: 40 cm (finished 38 cm).
Suggested double arrangement: 5 × 4 blocks (200 × 160 cm) + 5 cm sashing between blocks + 10–15 cm border. The finished size reaches ~2.20 × 2.40 m.
2) Making the Blocks
Choose one of the stars (Lone Star or Kites) to repeat, or alternate the two.
For each block, assemble the star in the center and complete with background triangles until you have a 40 cm square.
Rhythm Tip: Cut all the kites/diamonds at once, arrange them in trays per block, and chain stitch.
3) Sashing and Borders
Cut 5.5 cm strips from the blue fabric (they end up 5 cm).
Assemble the quilt in rows: block-to-strip-to-block… Join the rows with joining strips.
Add a 5 cm inner border in blue and a 10–15 cm outer border in floral.
4) Sandwich and Quilting
On a clean surface, lay the lining (right side down), then the batting, then the top.
Pin/spray glue every 10–12 cm.
Recommended Quilting:
Eco quilting on the stars (1 machine foot away from the seams);
Wide waves or spirals on the bottom;
A gentle meander on the edges.
Start from the center toward the edges to avoid puckering. Adjust the presser foot pressure if you notice stretch.
5) Bias and Finishing
Make a continuous bias tape 6 cm wide (or use ready-made bias tape).
Sew the bias tape to the right side of the quilt, going around the corners using the mitered pattern; turn it to the wrong side and topstitch by hand or machine.
Make a label with the name, date, and measurements: it’s part of the patchwork tradition.
Troubleshooting
Wrinkled center on the star: Decrease 2–3 final stitches, open the seam, and press the edges “mill” (turning to opposite sides).
Misaligned stripes (Lone Star): Check that the first 45° cut was made with the ruler perfectly supported; Pin where the stripes meet before sewing.
Crooked circle on the pillow: Always cut out the circle after quilting; use a rigid template and pierce the edges to set it.
Waving in the quilt: Excessive loose batting or poorly smoothed sandwich. Re-pin with more pins and reduce the speed.
Variations and ideas
Swap the floral pattern for plaid or polka dots for a country look; use a gradient of blues for depth.
Make a square pillow cover (45 x 45 cm) using the same block without cutting it into a circle.
Apply a contrasting pad (red or green) to outline the design and highlight the round shape.
Use foundation paper piecing if you prefer to sew on paper: it guarantees ultra-precise points, especially on the kite star.
Quick Checklist
Pre-washed and ironed fabrics.
Cut strips (Lone Star) or kites + triangles (Petal Star).
Assembled star and completed block up to 38–40 cm.
Sandwich, quilting, cutting out the 45 cm circle.
Zippered or envelope backing, joining, stuffing.
For the quilt: repeat blocks, sashing, borders, quilting, and bias binding.
Full and Free Pattern Click Here
With these steps, you’ll have round star pillows like the ones in the picture and a coordinated quilt that will be the centerpiece of your bedroom. The secret is precision cutting, checking the corners, and using a careful iron at each step. Follow the rhythm, respect the margins, and let the stars shine in your decor!


