Christmas is a magical time, full of traditions, colorful decorations, and special family moments. And nothing goes better with this holiday than creating handmade decorations full of charm and personality. Among the creative ideas that have been gaining ground in homes, Christmas sock dolls stand out. They’re easy to make, inexpensive, and a truly adorable addition to your home, your dinner table, or even as a gift for someone special.
If you’re looking for a fun activity to do alone or with your family, this step-by-step guide is perfect for you. We’ll teach you how to transform a simple sock into a stylish Christmas snowman.
Get your creativity ready and get to work!
Materials Needed
Before you begin, it’s important to gather all the items you’ll need. The good news is that you probably already have most of the materials at home or can easily find them at hardware stores and stationery stores.
White socks (cotton or long, preferably plain)
Scissors
Thread and needle or hot glue
Rice, sand, or acrylic stuffing (to give the doll weight and volume)
Small rubber bands or string (to tie and form the doll’s parts)
Colorful buttons (to decorate the doll’s “belly”)
Black-headed pins or beads (for the eyes)
Orange/yellow-tipped beads or pins (for the nose)
Colorful fabric or wool scraps (for the scarf)
Socks or pieces of colorful fabric (to make hats and details)
Hot glue or craft glue (to attach the decorations)
Step by Step: How to Make a Christmas Sock Doll
Now that we have everything on hand, let’s move on to assembling the doll. The step-by-step instructions are simple and can be adapted to your creativity.
Click and download the free pattern
1. Preparing the Doll’s Base
Take a white sock and cut off the foot, leaving only the shaft. This will be the doll’s “skin.”
Turn the sock inside out, tie one end with a rubber band or sew it with thread, and then turn it right-side out again. This will ensure one end is securely closed.
2. Stuffing the Sock
With the sock closed at one end, fill it with rice, sand, or acrylic filling. If you choose rice, the doll will be heavier and firmer, ideal for use as a doorstop. With acrylic filling, it will be lighter and fluffier, perfect for table decorations.
Stuff until it forms a rounded shape, similar to a large ball.
3. Forming the Body and Head
After filling the sock completely, use a rubber band to tie the top and close the filling.
Now, to create the division between the doll’s belly and head, use another elastic band or string, wrapping it around the middle of the body and pulling firmly. This will create two sections: the larger one will be the belly and the smaller one will be the head.
4. Making the Hat
For the hat, use the foot part of the sock you cut off earlier. Turn the edge outward, like a hem, and fit it over the doll’s head, creating a cute hat.
If you prefer a change, you can use colorful socks, fabric scraps, or even felt to create different hats.
5. Making the Scarf
Cut a strip of colorful fabric or use a piece of ribbon or yarn to make a makeshift scarf. Tie it around the doll’s “neck,” covering the thread or elastic that separates the head from the body. This detail adds a lot of charm and helps hide the finishing touches.
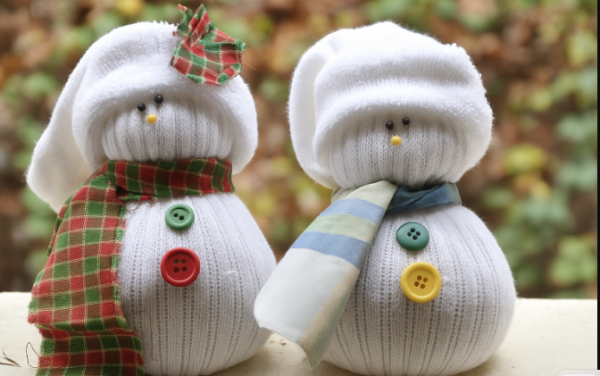
6. Gluing the Buttons
Choose colorful buttons and glue them to the snowman’s belly using hot glue or craft glue. These represent the buttons on the snowman’s coat.
You can vary the colors and sizes to make each snowman unique.
7. Making the Face
Using black safety pins or beads, make the snowman’s eyes. For the nose, use an orange/yellow bead or even a small piece of felt in this shade.
Glue or pin it to the snowman’s head. If desired, you can also use a fabric pen to draw the mouth and add even more personality.
Click and download the free pattern
8. Extra Details
Now that the snowman is ready, you can get creative and customize it however you like:
Add dried twigs to simulate arms.
Make mini Christmas decorations out of foam and glue them to the snowman.
Add glitter, bows, or small balls for a more festive touch.
Tips for Customizing Your Snowmen
Variety of sizes: Use socks of different lengths to create large, medium, and small snowmen.
Family Kit: Make three snowmen of different sizes to create a “snow family.”
Various colors: Use red, green, and gold fabrics to make the snowmen even more Christmassy.
Creative gift: Wrap the snowmen in clear cellophane and give as gifts to friends and family. It’s inexpensive, unique, and made with love.
Activity with children: Invite the little ones to help glue on buttons and choose scarves. They’ll love participating!
Where to Use Sock Snowmen at Christmas
These snowmen are versatile and can decorate various corners of your home. Here are some ideas:
On the dinner table: as part of the centerpiece.
In the living room: next to the Christmas tree or on shelves.
In the children’s room: as a playful decoration.
In the entryway: to welcome guests with charm.
As a doorstop: if filled with rice or sand.
Advantages of Making Christmas Stocking Dolls
Low cost: uses materials we already have at home.
Sustainability: reuses stockings that would otherwise be discarded.
Creativity: allows for varying colors, sizes, and details.
Relaxing activity: a great craft hobby.
Family bonding: fun activity to do with children and family.
Conclusion
Making Christmas stocking dolls is a simple, economical, and charming activity that transforms small materials into great keepsakes. Besides being a creative decoration, it’s also a way to add your personal touch to Christmas decorations, making your home even more welcoming for this special time of year.
With just a few stockings, buttons, and scraps of fabric, you can create true works of art, ranging from delicate ornaments to unique gifts.


