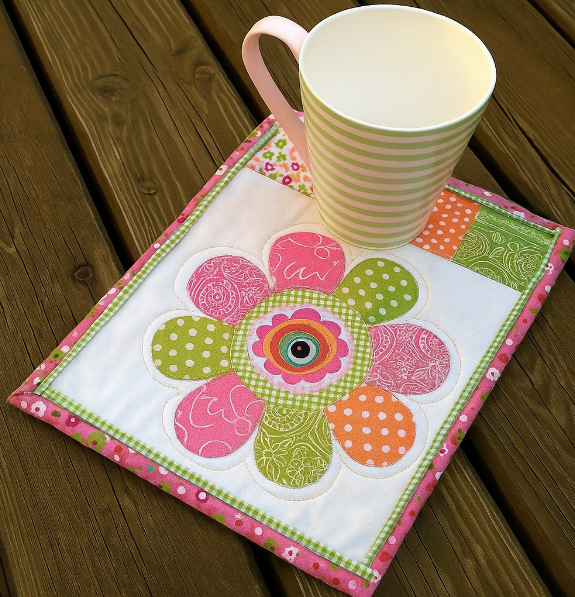
Welcome to my crafting corner! If you’re looking for a fun, colorful project that combines quilting, appliqué, and a touch of whimsy, this flower mug rug is perfect for you. Inspired by a delightful image of a striped mug resting on a vibrant, quilted mat adorned with a quirky flower design, this tutorial will guide you through creating your own “mug rug” – essentially a mini quilt that serves as a coaster for your cup (xícara) and a small plate (prato) or snack area. It’s not just functional; it’s a lindo (beautiful) piece that adds personality to your table. Think of it as a descanso de panela (pot rest or trivet) but scaled down for everyday use, protecting surfaces from heat while showcasing your sewing skills.
This project is beginner-friendly with some intermediate techniques like appliqué, but I’ll break it down into detailed steps so you don’t miss a thing. The finished piece measures about 8×10 inches, with a central flower appliqué featuring layered petals in playful patterns – pinks, greens, oranges, polka dots, and paisleys – and a quirky “eye” center that gives it a fun, almost animated look. There’s even a side pocket for a spoon, tea bag, or biscuit. Plan for 4-6 hours of active time, plus drying if needed. Let’s dive in!
Materials You’ll Need
To replicate the look from the image, gather these supplies. I’ve specified quantities for one mug rug, but scale up for multiples.
- Fabrics:
- White or light background fabric: 1/4 yard (for the main top and pocket lining).
- Assorted scraps for petals: Pink solid (1/8 yard), green polka dot (1/8 yard), orange solid (1/8 yard), pink paisley (1/8 yard), green floral (1/8 yard), and orange polka dot (1/8 yard). These create the multi-layered flower.
- Border and binding fabric: Pink striped or coordinating print (1/4 yard).
- Backing fabric: Any sturdy cotton (1/4 yard, slightly larger than the top).
- Batting: Low-loft cotton or insulated batting (1/4 yard, for heat resistance).
- Notions and Extras:
- Fusible web (like HeatnBond Lite): 1/2 yard, for appliqué.
- Thread: Matching colors for sewing and quilting, plus black or contrasting for the “eye” detail.
- Buttons or embroidery floss: For the flower center (one small black button or felt circle for the eye).
- Fusible interfacing (optional): For added stiffness in the pocket.
All fabrics should be 100% cotton for easy pressing and durability. Pre-wash everything to prevent shrinkage – soak in warm water, dry, and iron flat. This step is crucial; skipping it could lead to puckering later.
Tools Required
- Sewing machine with straight and zigzag stitches.
- Rotary cutter, mat, and ruler (or scissors for precision cutting).
- Iron and ironing board.
- Pins, clips, and a seam ripper.
- Fabric marker or chalk.
- Template paper or cardstock for patterns.
- Needle for hand-sewing (if adding button details).
Safety first: Ensure your sewing area is well-lit, and unplug the iron when not in use.
Step 1: Preparing the Patterns and Cutting Fabrics
Start by creating templates based on the image. The flower has a central circle with eight irregular petals radiating out, like a daisy with personality. The overall mat is rectangular with rounded corners and a pocket on one side.
- Draw the base: On paper, sketch a 7×9-inch rectangle for the main top. Round the corners slightly for a soft look.
- Flower template: Draw a 3-inch diameter circle for the center. Around it, sketch eight petals – vary shapes: some wavy (like the pink ones), some oval (greens), overlapping slightly. Make them 2-3 inches long. The image shows alternating colors: pink, green dot, pink paisley, orange, green floral, orange dot, etc.
- Pocket: A 4×5-inch rectangle, folded to create a 4×3-inch pocket.
- Trace templates onto fusible web (paper side up). Cut roughly around each.
- Iron fusible web to the wrong side of petal fabrics, following package instructions (medium heat, no steam, 5-10 seconds). Let cool.
- Cut out petals precisely along lines. Peel off paper backing – the sticky side is now ready for appliqué.
- For the main pieces:
- Cut background fabric: One 8×10-inch piece (top), one 5×6-inch for pocket.
- Backing and batting: 9×11-inch each (oversized for trimming).
- Binding: Cut 2.5-inch wide strips, total 40 inches long (join if needed).
- Border: Cut four strips – two 2×8-inch, two 2×11-inch.
Take your time cutting; accurate pieces ensure a professional finish. If using a rotary cutter, align ruler edges perfectly to avoid wonky shapes.
Step 2: Appliqué the Flower Design
Appliqué is where the magic happens – it’s what makes this mug rug “lindo” like in the image.
- Lay the background fabric right-side up on your ironing board.
- Arrange petals in a circle, overlapping at the center. Refer to the image: start with a pink petal at 12 o’clock, then green dot at 1:30, pink paisley at 3, orange at 4:30, and so on, creating a balanced, colorful wheel.
- Place the center circle on top, covering overlaps. The image has a quirky “eye” – cut a small white circle with a black dot (or use a button).
- Once arranged, press with iron (medium heat, 10 seconds) to fuse in place. Don’t slide the iron; press down firmly.
- Move to your sewing machine. Set to a narrow zigzag stitch (width 2-3mm, length 1mm).
- Stitch around each petal edge, securing to the background. Use thread matching each petal for invisibility, or contrasting for pop. Go slowly around curves – pivot with needle down.
- For the center: Zigzag around the circle, then hand-sew the “eye” button or embroider a simple French knot for detail.
- Press the entire top piece from the back to set stitches.
This step takes about 45 minutes. If fusible web lifts, re-iron or add fabric glue dots. Mistakes? Seam rip carefully and reposition.
Step 3: Adding the Pocket and Assembling Layers
The pocket adds functionality, perfect for holding a spoon or treat next to your xícara.
- Take the pocket fabric (5×6-inch). Fold in half right-sides together to 5×3-inch, sew along the long raw edge with 1/4-inch seam. Turn right-side out, press.
- Optional: Add interfacing inside for structure – iron on before folding.
- Position pocket on the right side of the background, aligning bottom and side edges (as in the image, next to the flower).
- Baste in place with pins or clips.
- Now, layer the quilt sandwich: Backing wrong-side up, batting on top, then appliquéd top right-side up. Smooth out wrinkles.
- Pin or spray baste layers together. Start from center and work out to avoid bubbles.
Assembly ensures everything stays aligned for quilting.
Step 4: Quilting the Layers
Quilting adds texture and holds it all together.
- Set machine to straight stitch, walking foot attached (helps with layers).
- Quilt around the flower outline first – echo the petals 1/4-inch out for definition.
- Add free-motion or straight-line quilting: In the image, it’s simple stippling (meandering stitches) in the background for a puffy effect.
- For borders: If adding, sew strips to sides first (right-sides together, 1/4-inch seam), then top/bottom. Press seams open.
- Quilt lines in borders – parallel to edges or diagonal for interest.
- Trim excess batting and backing to match top edges.
Quilt densely for heat resistance – aim for stitches every 2-3 inches. This step can take 1-2 hours; practice on scraps if new to free-motion.
Step 5: Binding and Finishing Touches
Binding gives a polished edge.
- Join binding strips end-to-end at 45 degrees, press seams open.
- Fold binding in half lengthwise, wrong-sides together, press.
- Starting midway on one side, align raw edges with mug rug edge. Sew with 1/4-inch seam, mitering corners: Fold at 45 degrees, continue.
- Fold binding to back, hand-stitch or machine topstitch in place.
- Clip threads, press entire piece.
- Optional: Add a hanging loop from binding scrap if desired.
Inspect for loose threads or uneven spots – fix now.
Tips for Success and Variations
- Fabric choices: Stick to cottons for easy handling. For a holiday twist, use seasonal prints.
- Scaling: Make larger for a full descanso de panela (pot rest) by doubling dimensions.
- Care: Machine wash gentle, air dry to preserve colors.
- Common pitfalls: Uneven appliqué – always fuse first. Puckering? Use more pins.
- Advanced: Add embroidery for extra detail or use raw-edge appliqué for a rustic look.
This project not only creates a functional item but also hones your skills in piecing, appliqué, and quilting. The image’s vibrant, eye-catching design inspired me to emphasize color play – experiment to make it yours!


