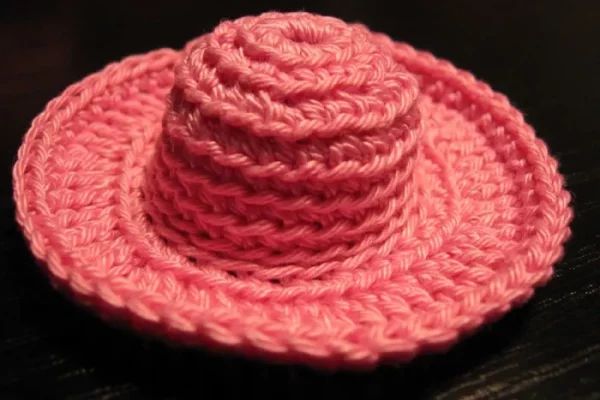
How to Crochet a Barbie Doll Hat: A Simple and Fun Guide
Barbie dolls are known for their fabulous fashion, and one of the easiest ways to add a touch of style and personality is with a handmade hat. Crocheting a hat for Barbie is a fun and rewarding project that allows you to customize her look and create a unique accessory that completes any outfit. Whether you’re looking for a casual beanie, a sun hat, or something more elegant, this guide will walk you through the steps to crochet a perfect hat for Barbie.
Why Crochet a Hat for Barbie?
- Customizable Fashion: Create hats that match Barbie’s outfits and personal style, with endless possibilities for colors, textures, and embellishments.
- Skill-Building: This project helps you practice and refine your crochet skills, such as working in the round, increasing, and adding decorative stitches.
- Quick and Easy: A hat for Barbie is a small project that can be completed quickly, making it perfect for beginners and seasoned crafters alike.
- Fun and Creative: Personalize Barbie’s wardrobe with a hat that stands out, whether it’s a casual knit hat, a sun hat, or a formal piece.
Materials You’ll Need:
- Yarn: Use a lightweight yarn such as sport weight or DK (double knitting) yarn. Cotton yarn is a great option for summer hats, while acrylic works well for all-around wear.
- Crochet Hook: A small hook, typically 2mm to 3mm (sizes B/1 to C/2), works best for Barbie-sized projects.
- Measuring Tape: To measure the head circumference of Barbie and ensure a snug fit.
- Scissors: For cutting the yarn.
- Yarn Needle: To weave in the loose ends and make any final adjustments.
- Stitch Markers (optional): To help keep track of your rounds and stitches.
Step-by-Step Guide to Crocheting a Basic Barbie Hat:
Part 1: Measure and Create the Foundation
Step 1: Measure Barbie’s Head
- Use a measuring tape to measure the circumference of Barbie’s head just above her ears. This will help ensure that the hat fits snugly.
Step 2: Create the Foundation Chain
- Chain a number of stitches that matches Barbie’s head circumference. For example, if her head circumference is about 14 inches (35.5 cm), use the number of stitches that matches this length, adjusting based on the yarn and hook size.
Step 3: Join the Chain
- Join the chain into a circle using a slip stitch, making sure not to twist the chain.
Part 2: Crochet the Hat Body
Step 1: Work in the Round
- Round 1: Chain 3 (counts as the first double crochet) and work double crochet stitches (dc) around the foundation chain. Join the round with a slip stitch into the top of the starting chain-3.
- Round 2 and Beyond: Continue crocheting in rounds, using double crochet stitches to create a simple hat shape. Increase by working 2 double crochet stitches into certain stitches to gradually widen the hat as needed. You can also work in half double crochet or single crochet for a more fitted or textured look.
Step 2: Create the Desired Hat Height
- Keep crocheting until the hat reaches the desired height for Barbie. For a beanie-style hat, aim for 2-3 inches (5-7.5 cm). For a sun hat or larger hat, adjust the height to your preference.
Part 3: Add the Hat Brim (Optional)
Step 1: Create a Brim
- To add a brim, switch to a smaller hook size or continue with the same hook to create a tighter stitch.
- Work in single crochet (sc) or a shell stitch pattern around the edge to create a brim that flares out. You can also crochet a few rows of double crochet, with slight increases, for a flared brim.
Step 2: Add Texture
- For a more decorative look, try using a textured stitch such as front post double crochet (FPdc) or shell stitches around the brim. This will add extra visual interest to the hat.
Part 4: Finishing Touches
Step 1: Weave in the Ends
- Use a yarn needle to weave in the loose ends of the yarn and secure them tightly.
Step 2: Embellishments (Optional)
- Add small bows, beads, flowers, or buttons to give the hat a unique look. Sew them on securely with a yarn needle.
Step 3: Try It On Barbie
- Place the hat on Barbie’s head and check for fit. Adjust the hat by adding or removing rows, or altering the brim if necessary.
Customization and Styling Tips:
- Color Combinations: Use contrasting colors for the main body of the hat and the brim for a two-tone look.
- Seasonal Themes: Make a lightweight, openwork sun hat for summer or a cozy, textured beanie for winter.
- Texture and Patterns: Experiment with different stitch patterns such as shells, bobble stitches, or front post double crochet for added visual appeal.
- Embellishments: Use crochet flowers, pom-poms, or tiny crocheted animals to decorate the hat for a fun and personalized touch.
Troubleshooting and Tips:
- Fit Issues: If the hat is too tight, add more stitches in the round or use a larger hook. If it’s too loose, reduce the number of stitches or use a smaller hook.
- Uneven Edges: Ensure that you’re crocheting consistently and keep track of your increases and decreases to avoid an uneven edge.
- Adjusting for Different Styles: For a slouchy hat, add more rows and make it a little larger. For a snug fit, use tighter stitches and less height.
Conclusion
Crocheting a hat for Barbie is a delightful way to enhance her wardrobe with a handmade touch. Whether you’re making a cozy winter hat, a chic sun hat, or something entirely unique, this project allows you to express your creativity while practicing your crochet skills. With a few simple steps and a little imagination, you’ll have a perfect hat that will have Barbie looking stylish and ready for any occasion. Enjoy the process and have fun experimenting with different styles and colors!
FREE PATTERN HERE
Compartilhe com os amigos

