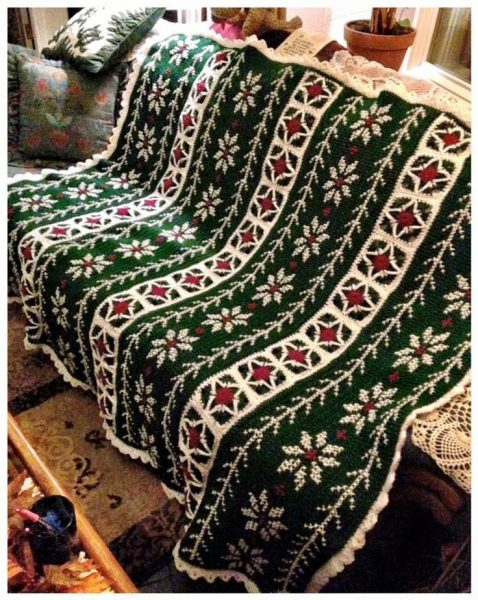
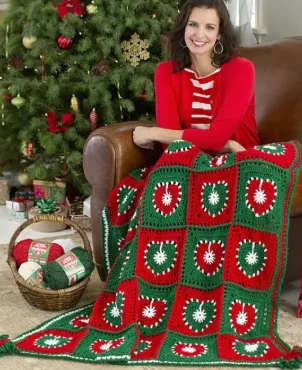
Crochet Poinsettia Cross Stitch Throw Pattern
The Poinsettia Cross Stitch Throw is a beautiful project that brings a festive, holiday-inspired design into your home. This throw combines traditional crochet with cross-stitch elements, creating a visually appealing texture that evokes the warmth and cheer of the season. Perfect for cozying up during the winter months or gifting to a loved one, this pattern is both enjoyable to make and a show-stopper when completed. Below, you’ll find all the instructions you need to create this eye-catching throw.
Materials Needed:
- Yarn: Choose a worsted-weight yarn such as Red Heart Soft or Caron Simply Soft in a combination of colors. You’ll need:
- Main color (e.g., white, cream, or light beige) for the background: approximately 1,200 yards
- Accent colors (e.g., red, green, and gold) for the poinsettia and cross-stitch details: small amounts of each
- Crochet Hook: Size H-8 (5.0mm) or size recommended on the yarn label.
- Cross-Stitch Needle: For adding the cross-stitch elements.
- Scissors: For cutting yarn.
- Tapestry Needle: For weaving in loose ends.
- Graph Paper: Optional, for planning out your cross-stitch pattern if you want to customize the design.
Finished Size:
Approximately 50 x 60 inches (can be adjusted by adding or reducing the number of rows or stitches).
Abbreviations Used:
- ch = chain
- sc = single crochet
- dc = double crochet
- sl st = slip stitch
- sp = space
- st = stitch
- rep = repeat
Pattern Instructions:
Note: This throw is crocheted in rows with a cross-stitch pattern added after the main body is completed. It is worked from the bottom up, starting with the base and then adding the cross-stitch design.
Step 1: Foundation Row
- Ch 150 (or adjust to create a wider or narrower throw).
Step 2: Base Row (Background)
- Row 1: Dc in the 4th ch from the hook and in each ch across. Turn.
- Row 2-10: Ch 3 (counts as a dc), dc in each dc across. Turn.
- Repeat Row 2 until you have a solid base for the throw. You should have a length of approximately 50 inches.
Step 3: Adding the Poinsettia Cross-Stitch Design
- Cross-Stitch Pattern:
- Once the main body of the throw is complete, plan out the placement of your cross-stitch design. You can use graph paper or a printed chart to help map out the poinsettia and any additional details.
- Use the accent color yarns to add cross-stitching on top of the crocheted fabric.
- Cross-Stitch Instructions:
- Insert the cross-stitch needle from the back of the fabric to the front.
- Create the cross-stitch by making an “X” shape in each designated area of the design. Follow your chart for accurate placement.
- Finishing the Cross-Stitch:
- Once the cross-stitch design is complete, tie off the ends at the back of the throw and weave them in securely with the tapestry needle.
Step 4: Adding a Border
- Border Row 1: Using the main color, sc evenly around the perimeter of the throw, making 3 sc in each corner to maintain the shape. Join with a sl st to the first sc. Turn.
- Border Row 2: Ch 1, hdc in each st across to the next corner, 3 hdc in the corner. Repeat around the entire throw. Join and fasten off.
Tips for Success:
- Cross-Stitch Placement: Ensure that your cross-stitch pattern is evenly spaced and aligned. Use stitch markers or light pencil marks to help keep track of the placement.
- Choosing Yarn Colors: When selecting your yarn, choose high-contrast colors for the poinsettia and cross-stitch details to make them stand out against the background.
- Tension: Be mindful of your tension when adding the cross-stitch. If your stitches are too tight, it may pull on the fabric and create puckering.
- Weaving in Ends: Use the tapestry needle to securely weave in the ends, especially for the cross-stitch thread, to ensure the design stays intact.
Customization Ideas:
- Size Adjustments: Add or reduce the number of foundation chains to create a larger or smaller throw.
- Additional Designs: You can add more cross-stitch details, such as holly leaves or snowflakes, around the poinsettia for a more elaborate pattern.
- Color Variations: Experiment with different background and accent colors to fit your home’s décor or personal preferences.
Final Thoughts:
The Poinsettia Cross Stitch Throw is not only a functional item but also a decorative piece that captures the spirit of the holiday season. It’s a great project for experienced crocheters who want to add a touch of embroidery to their work, or for beginners looking to try something new. This throw is sure to be cherished by your family or make a thoughtful gift for someone special. Enjoy crafting this beautiful throw and spreading the warmth and cheer it brings!
FREE PATTERN HERE
Compartilhe com os amigos

