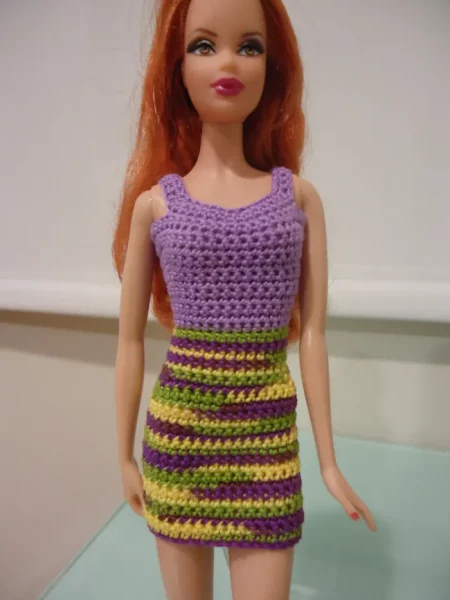
Crochet a Sheath Dress With Straps for Barbie: Free Pattern Guide
A sheath dress is an essential piece in any doll’s wardrobe — timeless, elegant, and versatile. Crocheting a sheath dress with straps for Barbie adds a touch of sophistication and style to her collection. Whether Barbie is headed to a fancy event or simply enjoying a day out, a handmade sheath dress will make her look and feel special. Follow this step-by-step guide to crochet a stylish and comfortable sheath dress with adjustable straps for your Barbie doll.
Why Crochet a Sheath Dress With Straps for Barbie?
- Chic and Elegant: This dress style is perfect for any formal or semi-formal occasion.
- Customizable Fit: Crocheting your own dress ensures it fits Barbie perfectly.
- Creative Expression: Personalize your dress with different yarn colors, stitch patterns, and embellishments.
- Skill Building: This project is great for practicing shaping, increases, and basic crochet techniques.
Materials You’ll Need:
- Yarn: Choose a lightweight yarn such as sport weight or DK (double knitting) yarn. Cotton or acrylic yarn is ideal for comfort and durability.
- Crochet Hook: A small hook, usually between 2mm and 3mm (sizes B/1 to C/2).
- Measuring Tape: To measure Barbie’s bust, waist, and hip circumference for a precise fit.
- Scissors: For cutting the yarn when finished.
- Yarn Needle: To weave in the loose ends.
- Stitch Markers (optional): To help keep track of your rounds and stitch placement.
Part 1: Creating the Bodice
Step 1: Measure Barbie’s Bust and Waist
- Use a measuring tape to measure Barbie’s bust and waist. This will help ensure the dress will fit snugly without being too tight.
Step 2: Create the Foundation Chain
- Chain a number of stitches that matches Barbie’s bust measurement, adding a few extra stitches for ease. Join the chain with a slip stitch to form a circle, being careful not to twist it.
Step 3: Crochet the Bodice
- Round 1: Chain 3 (counts as the first double crochet) and work double crochet (dc) stitches around the foundation chain. Join with a slip stitch at the top of the chain-3 to close the round.
- Increasing for Fit: Increase by working 2 dc stitches into every 3rd or 4th stitch as you go to create a snug, but not tight, bodice shape. Adjust the number of increases based on Barbie’s measurements.
- Length of the Bodice: Continue working until the bodice reaches just above Barbie’s waist or to your desired length. For a more fitted look, you can add a few rows of hdc (half double crochet) stitches or sc (single crochet) stitches.
Part 2: Creating the Skirt
Step 1: Start the Skirt
- Switch to working in the round to create the skirt. Begin with a few rows of dc or hdc stitches to maintain the fitted look from the bodice.
- Increasing for Shape: Add increases by working 2 dc or hdc stitches in every 4th or 5th stitch to gently flare out the skirt, allowing it to cover Barbie’s hips and create a smooth transition.
Step 2: Continue to the Desired Length
- Work until the skirt reaches the desired length, whether knee-length or a bit longer for an evening dress look.
- Hem Design: Add a row of sc stitches or picot stitches at the bottom of the skirt for a decorative and finished look.
Part 3: Adding the Straps
Step 1: Create the Straps
- Attach your yarn to the top edge of the bodice on one side.
- Strap Length: Chain a length that reaches from the front of Barbie’s shoulder to the back. Make sure the length is appropriate to create a comfortable fit.
- Crochet the Strap: Work sc or hdc stitches along the chain until the strap is the desired thickness.
- Attach the Strap: Secure the strap to the back of the bodice by stitching it down with the yarn needle. Repeat for the second strap on the other side.
Part 4: Finishing Touches
Step 1: Weave in the Loose Ends
- Use a yarn needle to weave in any loose ends, ensuring they are hidden within the stitches.
Step 2: Try It On Barbie
- Carefully place the dress on Barbie to check for fit and adjust the straps as needed. If the straps are too long or short, make the necessary adjustments by re-crocheting or folding them to fit.
Customization and Styling Tips:
- Color Combinations: Choose vibrant or classic colors for the dress, or mix and match yarns for a unique look.
- Textured Stitches: Incorporate stitches such as shells or puff stitches for added detail in the skirt or bodice.
- Embellishments: Add small crochet flowers, buttons, or tiny beads to decorate the dress and give it an extra touch of elegance.
- Matching Accessories: Crochet a small clutch or headband to complete Barbie’s look.
Troubleshooting and Tips:
- Fit Adjustments: If the bodice or skirt is too tight or loose, adjust the number of stitches in the foundation chain or modify the number of increases.
- Secure Straps: To keep the straps from slipping off Barbie’s shoulders, sew them down securely and consider adding a decorative stitch or button to reinforce the straps.
- Even Stitching: Make sure your stitches are even to ensure a smooth and polished finish.
Conclusion
Crocheting a sheath dress with straps for Barbie is a fun and rewarding project that adds a touch of elegance to her wardrobe. This versatile piece is perfect for any occasion, from a fancy event to a casual day out. With a little creativity, you can customize the dress with different stitch patterns, colors, and embellishments. Enjoy the process, personalize your design, and have fun creating this beautiful handmade dress for Barbie!


