Crochet is a versatile and therapeutic art form that allows you to create a multitude of pieces, from clothing to home decorations.
One of the most enchanting creations is the crochet centerpiece with roses. In addition to adding a touch of elegance and charm to your home decor, this free pattern allows you to immerse yourself in the world of crochet in a creative and rewarding way.
In this article, we’ll explore how to create a beautiful crochet rose centerpiece, providing step-by-step instructions and helpful tips.

Required Materials
Before starting any crochet project, it’s important to make sure you have all the necessary materials on hand. For the crochet rose centerpiece, you will need the following items:
Crochet Yarn: Choose quality crochet yarn in colors that match the aesthetics of your decor. Cotton yarn is a great option as it is durable and provides a neat finish.
Crochet hook: The choice of hook depends on the size of the yarn you are using. Make sure the needle is suitable for the thickness of the yarn chosen.
Scissors: Sharp scissors are essential for cutting the threads as you go through the project.
Stitch Markers: These markers will help you keep track of stitches and increases/decreases needed.
Stuffing: If you want to add volume to the roses and leaves, a synthetic fiber stuffing may be necessary.
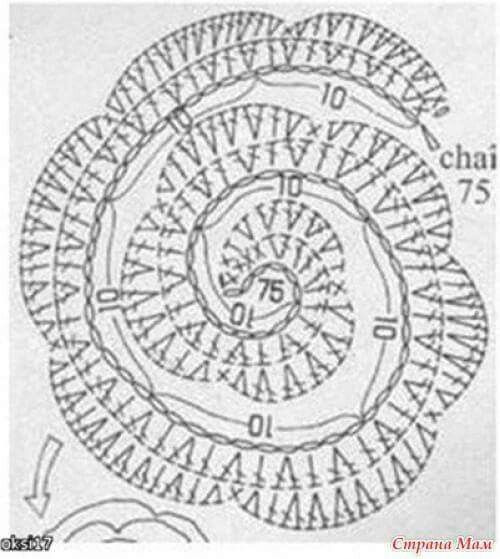
Pattern: Find a free crochet rose centerpiece pattern. This will serve as your guide during the creation process.
Raising the Roses
The roses are the highlight of this crochet centerpiece, and creating these enchanting flowers is an exciting part of the project. Follow these steps to create the roses:
Starter: Start by making a magic ring and secure it with a slip stitch to form a circle.
Outer Petals: Work several chains through the magic ring to form the base of the petals. Then make a series of double crochets in the ring, skipping a few chains between each double crochet. This will create the first layer of outer petals.
Inner Petals: For the inner petals, make single crochets between the high points on the outer layer. These petals should be a little shorter than the outer ones to give an overlapping effect.
Repetition: Repeat the process of creating outer and inner petal layers, increasing the number of stitches in each layer to create the rose’s characteristic shape.
Wrapping the Rose: Once you’ve created all the layers of petals, wrap the piece into a spiral, starting from the outside. This will form the rose. Secure the layers together with crochet stitches.
Finishing: Finish the rose with a slip stitch and tie the end of the thread. You can lightly fill the rose with filler for volume.
Adding Sheets and Details
The green leaves complement the roses and add a natural touch to the centerpiece. Here’s how to create the leaves:
Initial Chain: Make a little chain to start the sheet and work some low points in it.
Increases: As you progress on the sheet, make some increases, that is, make more single crochets in the same point to create an elongated oval shape.
Tip of the Leaf: When you reach the middle of the leaf, start decreasing the number of stitches to form the tip.
Leaf Turn: Work through the other side of the initial chain, making increases and then decreases to form the second half of the leaf.
Finishing: Finish the leaf with a slip stitch and tie off the thread.
Assembly and Finishing
Now that you’ve created your roses and leaves, it’s time to assemble the centerpiece and add the finishing touches:
Circular Base: Start by creating a circular crochet base of the desired size for the centerpiece.
Placement of Roses and Leaves: Arrange your roses and leaves harmoniously on the circular base. Use the stitch markers to keep everything in place before sewing.
Sewing: With a tapestry needle, sew the roses and leaves onto the circular base. Be sure to fix all parts securely.
Final Details: Make any necessary adjustments, such as hiding loose wire ends and making sure all pieces are securely fastened.
Enjoying Your Creation: Once everything is in place, your crochet rose centerpiece is ready to be displayed! Place it on a dining table, sideboard, or anywhere else you’d like to add a touch of handcrafted beauty.
Creating a crochet rose centerpiece is an enchanting way to decorate your home while engaging in a creative and relaxing project.
With the provided free pattern and the steps detailed above, you will be well on your way to creating a stunning piece that is sure to be admired by all.
Remember that practice is key in crocheting, so don’t be afraid to experiment and hone your skills as you progress through this rewarding project.


