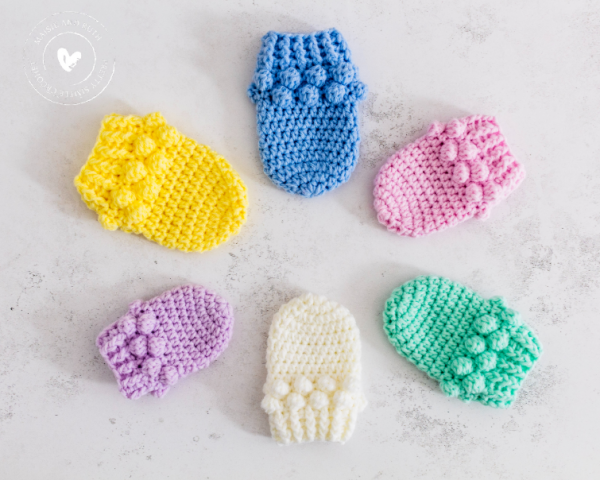
Bobble Crochet Baby Mittens: A Fun and Cozy DIY Project
Crocheted baby mittens are a perfect accessory to keep little hands warm and stylish. Whether you’re looking to make a thoughtful handmade gift for a newborn or simply want to add a cozy touch to a baby’s wardrobe, crocheting a pair of baby mittens is a rewarding project. Adding a bobble stitch to the design not only gives the mittens a cute texture but also makes them even more fun to crochet. In this article, we’ll walk you through an easy and adorable pattern for bobble crochet baby mittens that is perfect for beginners.
Materials Needed
Before you begin, gather the following materials:
- Yarn: Choose a soft, baby-friendly yarn. Opt for a lightweight yarn such as DK (double knitting) or sport weight. Acrylic, cotton, or a cotton-blend yarn is ideal since it’s soft and easy to care for.
- Crochet Hook: Use a 3.5mm (US size E/4) crochet hook, or whichever size works best with your yarn.
- Stitch Markers: Optional, but helpful for marking the beginning of each round.
- Tapestry Needle: For weaving in any loose ends once your mittens are finished.
- Button (Optional): You may want to add a cute button for decoration, though this is not necessary.
- Scissors: For cutting the yarn when you’re finished.
Basic Stitches Used
This pattern incorporates a few basic crochet stitches, along with the fun bobble stitch to create texture. The key stitches you’ll use are:
- Chain (ch): The foundation for most crochet projects.
- Slip Stitch (sl st): Used to join rounds or finish stitches.
- Single Crochet (sc): A basic, dense stitch that creates a solid fabric.
- Half Double Crochet (hdc): Slightly taller than a single crochet, this stitch is used to give the mittens a bit of stretch and flexibility.
- Bobble Stitch: A textured stitch that creates little raised “bubbles” on the fabric. This stitch is worked by making multiple double crochets in the same stitch and then pulling the yarn through all loops at once.
Pattern Overview
These mittens are crocheted in the round from the bottom up. The bobble stitch is used to add texture to the body of the mitten, while the cuff is worked with a simple ribbing effect to keep the mittens snug around the wrist. These mittens are designed to fit newborns to 3-month-olds, but you can easily adjust the size by changing the number of starting stitches and rows.
Step-by-Step Instructions
Step 1: Crochet the Cuff
- Round 1: Start with a foundation chain of 28 (adjust if you want a wider cuff). Join the chain with a slip stitch to form a ring.
- Round 2: Chain 1 to begin. Work 1 single crochet in each chain around. Join with a slip stitch to the first single crochet.
- Round 3-6: Work in the same pattern, single crocheting around for a few more rounds to create a nice, snug cuff.
Step 2: Work the Hand of the Mitten
- Round 7: Switch to half double crochet. Chain 2 (counts as the first half double crochet), then work 1 half double crochet in each stitch around. Join with a slip stitch to the top of the first half double crochet.
- Round 8-10: Continue working half double crochet in each stitch around for three more rounds. This gives the mitten body some length.
Step 3: Add the Bobble Stitches
- Round 11: This is where the bobble stitches come in! Start by chaining 2 (counts as the first half double crochet). In the same stitch, work 1 half double crochet.
- Next, work a bobble stitch in the following stitch: yarn over, insert your hook into the stitch, yarn over again and pull up a loop (3 loops on the hook). Repeat this process two more times (you will have 5 loops on the hook). Yarn over and pull through all 5 loops at once.
- Chain 1 to secure the bobble, then work 1 half double crochet in the next stitch.
- Repeat this pattern (1 half double crochet, 1 bobble stitch, 1 half double crochet) around the mitten for the entire round.
Step 4: Close the Mitten
- Round 12-13: After you’ve added the bobble stitches, you can work a few more rounds in half double crochet to smooth out the mitten and close up the top. Depending on how long you want the mitten to be, you can work 1-2 more rounds.
- Round 14: Finish the top of the mitten by working a round of single crochet to close any gaps and give the mitten a clean edge.
Step 5: Finish and Add a Button (Optional)
- Fasten off the yarn and weave in any loose ends with a tapestry needle.
- If you like, you can sew a small decorative button onto the top of the mitten, or even on the cuff for added charm.
Customizing Your Bobble Crochet Baby Mittens
This pattern is simple, but there are plenty of ways to make your mittens unique:
- Color Combinations: Choose a main color for the mittens and a contrasting color for the bobble stitches for a fun, playful look.
- Add a Thumb: For a slightly more advanced version, you can crochet a small thumb by working a few additional stitches on the side of the mitten. This will add extra warmth and make the mitten more functional.
- Embellishments: Add a small pom-pom, a ribbon, or a cute applique to personalize the mittens further.
Conclusion
Bobble crochet baby mittens are not only a cozy and practical item to crochet, but they also add a touch of whimsy with their textured design. Whether you’re a beginner looking to practice basic stitches or an experienced crocheter seeking a simple yet stylish project, these mittens are perfect for you. They are quick to make, highly customizable, and will surely keep little hands warm and cute!
Happy crocheting, and enjoy the process of making these adorable baby mittens!


