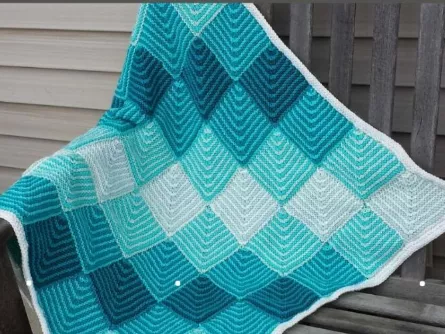
The Shortcake Baby Blanket is a sweet and cozy crochet pattern that combines simple stitches with a delightful texture, making it perfect for baby gifts or your own little one. The blanket typically features a classic combination of texture and stitch patterns to create a beautiful, soft, and warm piece. Below is a detailed guide for creating your own Shortcake Baby Blanket using a simple stitch combination and a bit of colorwork to bring it all together.
Materials:
- Yarn: Use a soft, baby-friendly yarn like acrylic or cotton. The yarn should be gentle on a baby’s sensitive skin.
- For this blanket, choose a worsted weight yarn (4-ply).
- You’ll need approximately 600-800 yards depending on your desired size.
- Crochet Hook: Size H (5mm) or I (5.5mm), depending on your yarn weight and tension.
- Tapestry Needle: For weaving in the ends.
- Scissors: For cutting yarn.
- Measuring Tape: To check the size of the blanket.
Abbreviations:
- ch = chain
- dc = double crochet
- sc = single crochet
- sl st = slip stitch
- sp = space
- st(s) = stitch(es)
- rep = repeat
- hdc = half double crochet
- fpdc = front post double crochet
- bpdc = back post double crochet
Shortcake Baby Blanket Pattern
1. Foundation Chain:
Start by chaining a number of stitches that fits your desired width. A typical width for a baby blanket is around 30 inches (76 cm).
For a blanket width of approximately 30 inches (76 cm), chain 108 stitches (this is a multiple of 3 + 2).
- Ch 108, or adjust based on your desired size.
2. Row 1: Starting the Blanket (Base Row):
- Ch 3 (counts as 1 dc).
- Work 1 dc in each of the remaining chains across the row.
- Turn your work.
3. Row 2: Textured Stripe Pattern (Begin with Half Double Crochet):
- Ch 2 (counts as 1 hdc).
- Work 1 hdc in the next stitch and every stitch across the row.
- Turn your work.
4. Row 3: Puff Stitch Row (Main Texture of the Blanket):
- Ch 3 (counts as the first dc).
- In the same stitch, make a puff stitch: (Yarn over, insert the hook into the next stitch, yarn over again, pull up a loop, yarn over, insert the hook again into the same stitch, yarn over and pull up a second loop, yarn over and pull through all loops on the hook).
- Ch 1 to close the puff.
- Skip the next 2 stitches and work a puff stitch into the next stitch.
- Repeat this pattern across the row: 1 puff stitch, skip 2 stitches.
- Finish with a dc in the last stitch (to maintain the edge).
- Turn your work.
5. Row 4: Continue Puff Stitches:
- Ch 3 (counts as first dc).
- Make a puff stitch in the first space between puff stitches from the previous row (not directly into a stitch).
- Skip the next space and make another puff stitch in the next space.
- Continue the pattern across the row: 1 puff stitch in each space, skip 1 stitch.
- Finish with a dc in the top of the turning ch-3 from the previous row.
- Turn your work.
6. Row 5: Continue with Half Double Crochet:
- Ch 2 (counts as 1 hdc).
- Work 1 hdc in each stitch across the row.
- Turn your work.
7. Repeat the Rows:
- Repeat Row 2 (hdc row) and Row 3 (puff stitch row) until the blanket reaches your desired length.
- Continue alternating the rows: the hdc row creates a smooth texture, and the puff stitch row creates a textured pattern. This combination gives the blanket a lovely texture and warmth.
8. Final Row (Edge):
- Once the blanket has reached the desired length, finish with a row of single crochet (sc) around the entire blanket for a neat edge.
- Work 1 sc in each stitch and in each space between puff stitches.
- For the corners, place 3 sc in the corner stitch to maintain the shape of the blanket.
9. Fasten Off and Weave in Ends:
- Cut your yarn, leaving a tail long enough to weave in.
- Use a tapestry needle to weave in the ends of the yarn, ensuring they are securely tucked in.
Optional: Border for Extra Detail
If you want to add an extra border, here’s a simple one that complements the puff stitch pattern:
- Round 1: Work sc around the entire blanket, placing 3 sc in each corner stitch to keep the edges straight.
- Round 2: Work picot stitches or shell stitches for a decorative border. A simple picot is made by chaining 3 and sl st into the first chain of the picot.
Customization Tips:
- Colors: You can make the blanket colorful by switching yarn colors for each row, or you can use multiple colors for the puff stitches or the border for added charm.
- Size Adjustments: You can make the blanket larger by adding more chains in the foundation row and continuing the pattern until it’s the size you want.
- Yarn Choice: Make sure to choose a soft, baby-safe yarn for comfort. Organic cotton yarn or bamboo yarn can also be a gentle choice for babies.
Final Thoughts:
The Shortcake Baby Blanket combines simple and textured stitches, making it easy to create while still producing a beautifully cozy and tactile fabric. Puff stitches add a lot of visual interest, while the half double crochet sections keep the blanket soft and flexible. This blanket can be customized with different colors and stitch patterns to create something truly unique for the baby in your life.
Enjoy your crocheting! Let me know if you need further assistance with this pattern.
FREE PATTERN HERE

Compartilhe com os amigos

