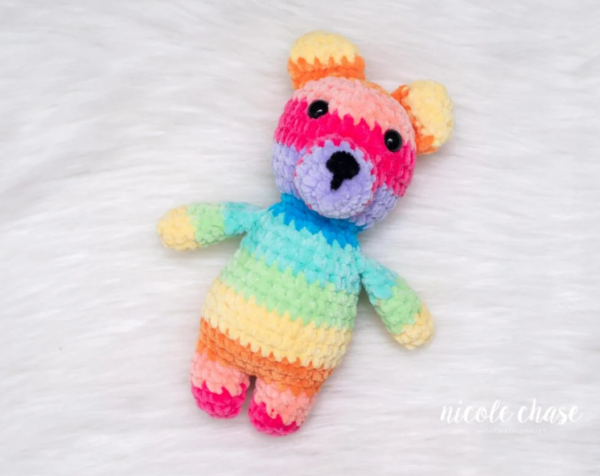
Rainbow Bear – Free Crochet Pattern

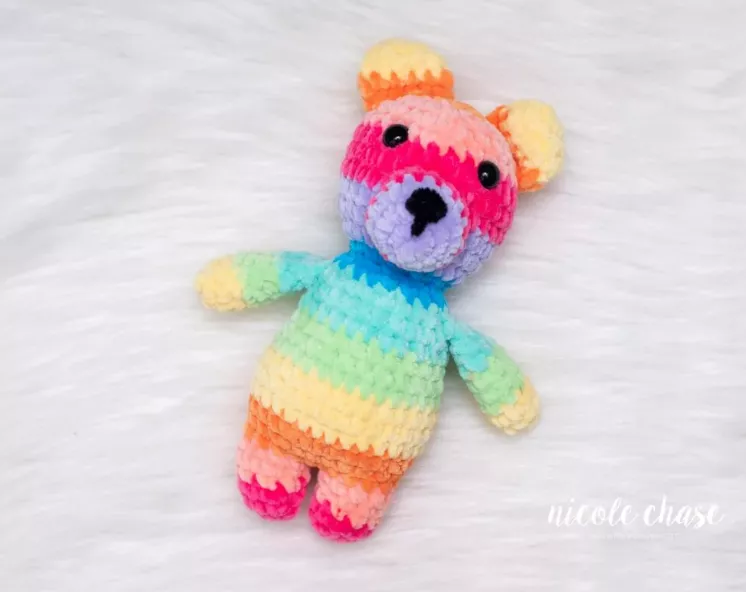
Here’s a free crochet pattern for a Rainbow Bear, a colorful and adorable teddy bear! This pattern is simple enough for beginners and includes a fun, rainbow-colored touch to make the bear extra special. Let’s get started!


Materials:

  • Yarn:
    • White (Main body, ears, and paws)
    • Rainbow yarn or various yarns in red, orange, yellow, green, blue, indigo, and violet (for the rainbow stripes)
  • Hook:
    • 3.5mm (E) crochet hook (adjust based on your tension)
  • Stuffing: Polyester fiberfill or any soft stuffing of your choice.
  • Tapestry needle: For sewing parts together and weaving in ends.
  • Safety eyes (optional) or you can use black yarn to stitch the eyes.
  • Stitch marker to mark the beginning of the round.

Abbreviations:

  • ch: Chain
  • sl st: Slip stitch
  • sc: Single crochet
  • inc: Increase (2 sc in the same stitch)
  • dec: Decrease (single crochet 2 together)
  • FO: Finish off

Bear Body (White yarn):

  1. Round 1: Make a magic ring, and work 6 sc into the ring. (6)
  2. Round 2: Inc in each stitch around. (12)
  3. Round 3: (Sc in next stitch, inc) around. (18)
  4. Round 4: (Sc in next 2 stitches, inc) around. (24)
  5. Round 5: (Sc in next 3 stitches, inc) around. (30)
  6. Round 6: (Sc in next 4 stitches, inc) around. (36)
  7. Rounds 7-12: Sc in each stitch around. (36)
  8. Round 13: (Sc in next 4 stitches, dec) around. (30)
  9. Round 14: (Sc in next 3 stitches, dec) around. (24)
  10. Round 15: (Sc in next 2 stitches, dec) around. (18)
  11. Round 16: (Sc in next stitch, dec) around. (12)
  12. Round 17: Dec around. (6)
  13. Stuff the body lightly with fiberfill.
  14. FO and leave a long tail to sew the body closed. Use the tail to close the opening and secure it.

Bear Head (White yarn):

  1. Round 1: Make a magic ring, and work 6 sc into the ring. (6)
  2. Round 2: Inc in each stitch around. (12)
  3. Round 3: (Sc in next stitch, inc) around. (18)
  4. Round 4: (Sc in next 2 stitches, inc) around. (24)
  5. Round 5: (Sc in next 3 stitches, inc) around. (30)
  6. Rounds 6-9: Sc in each stitch around. (30)
  7. Round 10: (Sc in next 3 stitches, dec) around. (24)
  8. Round 11: (Sc in next 2 stitches, dec) around. (18)
  9. Round 12: (Sc in next stitch, dec) around. (12)
  10. Round 13: Dec around. (6)
  11. Stuff the head lightly with fiberfill.
  12. FO and leave a long tail to sew the head closed. Use the tail to close the opening and secure it.

Rainbow Stripes (For the body, head, and limbs):

Instead of using solid white for the entire body or head, you will add rainbow stripes to give the bear a colorful look. You will alternate colors as you crochet the body, head, arms, and legs.

For each stripe, change color every 2-3 rounds (depending on your preference for how thick you want the stripes).


  1. Rainbow Stripe Sequence:
    • Red
    • Orange
    • Yellow
    • Green
    • Blue
    • Indigo
    • Violet

Start each round with the main color (e.g., red) and then, when it’s time to change colors, switch to the next color in the rainbow sequence. Continue until you’ve completed the body, head, arms, and legs with the rainbow pattern.

Bear Ears (Make 2, White yarn):

  1. Round 1: Make a magic ring, and work 6 sc into the ring. (6)
  2. Round 2: Inc in each stitch around. (12)
  3. Round 3: (Sc in next stitch, inc) around. (18)
  4. FO and leave a long tail for sewing. Do not stuff.

Bear Paws (Make 4, White yarn):

  1. Round 1: Make a magic ring, and work 6 sc into the ring. (6)
  2. Round 2: Inc in each stitch around. (12)
  3. Round 3: (Sc in next stitch, inc) around. (18)
  4. FO and leave a long tail for sewing. Do not stuff.

Nose (Black yarn):

  1. Round 1: Make a magic ring, and work 3 sc into the ring. (3)
  2. FO and leave a long tail for sewing.

Assembly:

  1. Sew the head to the body: Align the head with the top of the body and sew it securely into place using the tail from the head.
  2. Attach the ears: Position the ears on either side of the head and sew them on.
  3. Sew on the paws: Position the paws at the bottom of the body and sew them on.
  4. Attach the nose: Sew the nose to the front of the head.
  5. Add the eyes: If using safety eyes, attach them to the head. Alternatively, you can stitch eyes with black yarn.
  6. Add the rainbow stripes: You can add extra small stripes on the arms, legs, and body if desired, for a more colorful effect.

Final Touches:

  • Weave in all the yarn ends.
  • You can add a little smile or other features using black yarn.
  • Trim any stray yarn ends or extra long parts of the rainbow stripes.

Now your Rainbow Bear is complete! This colorful and cheerful bear is sure to bring a smile to anyone who sees it. You can modify the colors to fit your own style and make different variations. Enjoy crocheting your new cuddly friend!

Você disse:
Rainbow Bear – Free Crochet Pattern
O ChatGPT disse:
ChatGPT

Here’s a free crochet pattern for a Rainbow Bear, a vibrant and adorable teddy bear that’s perfect for beginners or intermediate crocheters! This pattern includes colorful rainbow stripes to make your bear extra cheerful.

Materials:

  • Yarn:
    • White or cream (for the body, head, ears, and paws)
    • Rainbow yarn (or individual yarn colors for the rainbow stripes: red, orange, yellow, green, blue, indigo, violet)
  • Hook:
    • 3.5mm (E) crochet hook (adjust based on your tension)
  • Stuffing: Polyester fiberfill or any soft stuffing of your choice
  • Safety eyes (optional) or you can use black yarn to stitch the eyes.
  • Tapestry needle for sewing parts together and weaving in ends
  • Stitch marker to mark the beginning of the round.

Abbreviations:

  • ch: Chain
  • sl st: Slip stitch
  • sc: Single crochet
  • inc: Increase (2 sc in the same stitch)
  • dec: Decrease (single crochet 2 together)
  • FO: Finish off

Body (White Yarn, then Rainbow Stripes)

  1. Round 1: Make a magic ring, and work 6 sc into the ring. (6)
  2. Round 2: Inc in each stitch around. (12)
  3. Round 3: (Sc in next stitch, inc) around. (18)
  4. Round 4: (Sc in next 2 stitches, inc) around. (24)
  5. Round 5: (Sc in next 3 stitches, inc) around. (30)
  6. Round 6: (Sc in next 4 stitches, inc) around. (36)
  7. Rounds 7-12: Sc in each stitch around. (36)
    • This is where you will start adding the rainbow stripes. Change colors every 2-3 rounds, following the rainbow pattern:
      • Red, Orange, Yellow, Green, Blue, Indigo, Violet.
      • Continue working in a continuous spiral without sl st at the end of each round.
  8. Round 13: (Sc in next 4 stitches, dec) around. (30)
  9. Round 14: (Sc in next 3 stitches, dec) around. (24)
  10. Round 15: (Sc in next 2 stitches, dec) around. (18)
  11. Round 16: (Sc in next stitch, dec) around. (12)
  12. Round 17: Dec around. (6)
  13. Stuff the body lightly with fiberfill.
  14. FO and leave a long tail to sew the body closed. Use the tail to close the opening and secure it.

Head (White Yarn, then Rainbow Stripes)

  1. Round 1: Make a magic ring, and work 6 sc into the ring. (6)
  2. Round 2: Inc in each stitch around. (12)
  3. Round 3: (Sc in next stitch, inc) around. (18)
  4. Round 4: (Sc in next 2 stitches, inc) around. (24)
  5. Round 5: (Sc in next 3 stitches, inc) around. (30)
  6. Rounds 6-9: Sc in each stitch around. (30)
    • Add the rainbow stripes like you did for the body, changing colors every 2-3 rounds.
  7. Round 10: (Sc in next 3 stitches, dec) around. (24)
  8. Round 11: (Sc in next 2 stitches, dec) around. (18)
  9. Round 12: (Sc in next stitch, dec) around. (12)
  10. Round 13: Dec around. (6)
  11. Stuff the head lightly with fiberfill.
  12. FO and leave a long tail to sew the head closed. Use the tail to close the opening and secure it.

Ears (Make 2, White Yarn)

  1. Round 1: Make a magic ring, and work 6 sc into the ring. (6)
  2. Round 2: Inc in each stitch around. (12)
  3. Round 3: (Sc in next stitch, inc) around. (18)
  4. FO and leave a long tail for sewing. Do not stuff.

Paws (Make 4, White Yarn)

  1. Round 1: Make a magic ring, and work 6 sc into the ring. (6)
  2. Round 2: Inc in each stitch around. (12)
  3. Round 3: (Sc in next stitch, inc) around. (18)
  4. FO and leave a long tail for sewing. Do not stuff.

Nose (Black Yarn)

  1. Round 1: Make a magic ring, and work 3 sc into the ring. (3)
  2. FO and leave a long tail for sewing.

Assembly

  1. Attach the head to the body: Position the head at the top of the body and sew it securely in place using the tail from the head.
  2. Sew on the ears: Position the ears on the top sides of the head and sew them in place.
  3. Attach the paws: Position the paws at the bottom of the body and sew them on.
  4. Sew on the nose: Position the nose on the front of the face and sew it on.
  5. Add the eyes: If using safety eyes, attach them to the head. If using black yarn, stitch the eyes into place.
  6. Add the rainbow stripes: Make sure your rainbow stripes are well aligned, and continue to add more if desired on the arms and legs for an extra colorful look.

Final Touches

  • Weave in all the loose ends from the yarn.
  • Trim any extra yarn or ends for a neat finish.
  • Optionally, add a smile or whiskers using black yarn.

Now your Rainbow Bear is complete! This colorful bear is perfect as a gift or as a fun home decor piece. You can customize the colors, add extra features like a bow or scarf, or even make variations for each of the seven rainbow colors. Enjoy your colorful crocheted friend!

Rainbow Bear – Free Crochet Pattern