
How to Make a Fabric Christmas Tree: Step-by-Step Tutorial

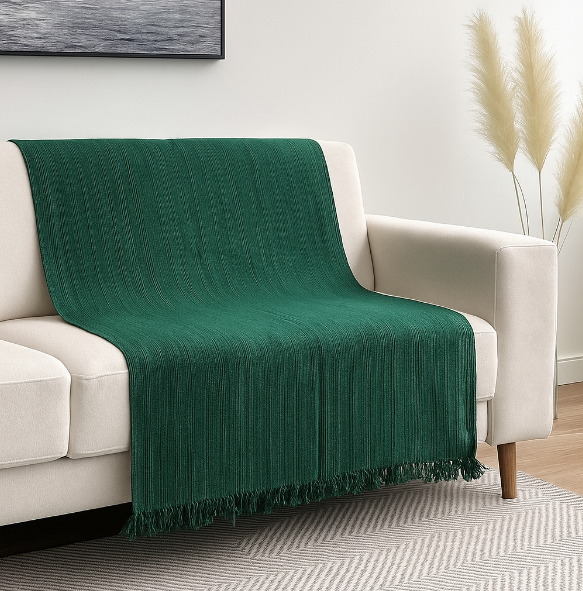
Throws are versatile pieces in home décor: they warm, bring coziness, and help transform the environment. The throw in the image above is a perfect example of how simplicity can result in sophistication: a plain piece, in deep green, with a subtle texture and discreet fringes along the edge.
If you’ve always wanted to learn how to make your own handmade throw, this complete guide will teach you everything from scratch: from choosing the materials to the final finishing touches.
Get ready for a rewarding project that will give you a unique piece, handmade, to decorate your home or even to give as a gift.
See also other free patterns here ➡ 📲🧵🧶
Before we begin the step-by-step process, it’s important to understand the benefits of crafting your own throw:
Full customization: choose the color, size, yarn type, and details that match your home.
Cost savings: often, it’s cheaper than buying a ready-made throw.
Exclusivity: no one will have the same piece as you.
Relaxation: handicrafts are excellent for relieving stress.
Special gift: a handmade throw is an unforgettable present.
Now that you’re convinced, let’s get to the fun part: the step-by-step guide.
To make a throw like the one in the image, you’ll need some basic materials.
Yarn: cotton yarn or medium-weight acrylic yarn is recommended, as they provide comfort and durability. For a sturdier effect, you may use size 6 cord.
Color: dark green is a great choice, but you can adapt it to your décor.
Crochet hook (if you choose crochet): size 4 or 5 mm.
Knitting needles (if you choose knitting): size 6 or 7 mm.
Tapestry needle: for finishing touches.
Sharp scissors.
Measuring tape.
Stitch markers (optional).
Sewing pins (if you need to secure fringes).
The throw in the image covers part of a three-seater sofa. However, you can adapt it to the desired size.
Here are some average reference measurements:
Two-seater sofa throw: 1.50 m x 1.80 m
Three-seater sofa throw: 1.80 m x 2.20 m
Double bed throw: 2.00 m x 2.20 m
Queen bed throw: 2.40 m x 2.60 m
King bed throw: 2.70 m x 2.80 m
For our tutorial, we’ll use the measurement of 1.80 m x 2.20 m, which works well for a large sofa or a double bed.
This throw can be made in different ways, depending on your skills:
Simple crochet: double crochet stitches or half double crochet stitches, creating a smooth effect with a light texture.
Basic knitting: stockinette stitch or rib stitch, resulting in a uniform and elegant look.
Sewing with plain fabric: if you prefer, you can sew a plain fabric and add fringes along the edges.
In this article, I’ll teach you using crochet, as it is one of the most practical and popular techniques for handmade pieces like this.
Make a chain measuring 220 cm in length (approximately 250 chains, depending on your yarn thickness and hook size).
Make sure the chain is straight and not twisted.
Chain 3 more for height.
Make 1 double crochet in each chain across the row.
At the end, turn your work.
Continue repeating rows of double crochet stitches.
For a textured look, alternate rows of double crochet with rows of half double crochet.
Work until the piece reaches 180 cm in length.
Crochet one row of single crochet stitches around the entire piece.
This will add firmness and prevent curling.
The fringes add the final charm to the throw. Here’s how to do it:
Cut yarn strands measuring 25 cm.
Group 4 to 5 strands together.
Fold them in half.
Using the crochet hook, pull the folded loop through one stitch on the bottom edge.
Pull the yarn ends through the loop and tighten.
Repeat along the entire edge.
Trim the fringes evenly if needed.
Change the color: choose neutral tones (gray, beige, white) or vibrant tones (yellow, blue, red).
Mix yarns: combine cotton and acrylic yarns for added shine.
Vary the stitch: textured stitches give the piece a unique touch.
Add embroidery: if you wish, embroider flowers or geometric patterns.
To make your throw last for years, follow these tips:
Wash by hand or in the delicate cycle of your washing machine.
Use mild soap.
Dry in the shade to preserve the color.
Store in a dry place to avoid moisture.
The time it takes to complete your throw depends on your skill level:
Beginners: 20 to 30 days (1 hour per day).
Intermediate: 10 to 15 days.
Advanced: 7 days or less.
Making a throw like the one in the image is easier than it looks. With simple materials and a bit of dedication, you’ll create a sophisticated handmade piece that can completely transform the décor of your living room or bedroom.
Besides being practical, this project is relaxing and can even become a source of income: handmade throws are highly valued in the market.
