
How to Make a Fabric Christmas Tree: Step-by-Step Tutorial

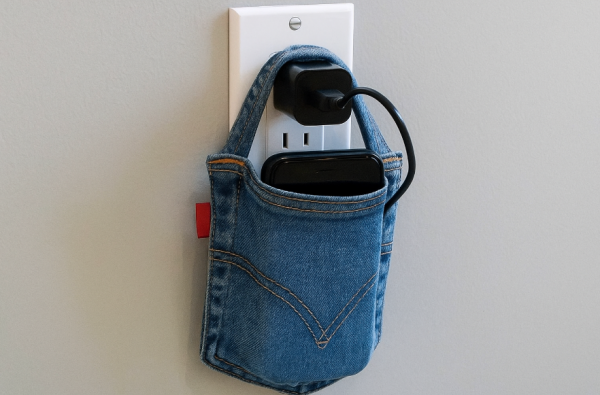
Jeans Cell Phone Outlet Holder: Step by Step (Easy, Beautiful, and Useful)
Want to repurpose an old pair of jeans and, as a bonus, eliminate your phone from being left on the floor while charging? This cell phone holder hangs from the charger itself, as shown in the image, and organizes everything in style. See how to make it.
Materials
1 pair of old jeans (preferably the back with a pocket).
Strap: This can be a waistband, a hem, or a cotton ribbon (approximately 18–22 cm long x 2–3 cm wide).
Sturdy thread (polyester) and a denim needle or sewing machine.
Scissors, pins, chalk or fabric pen, ruler/tape measure.
Optional: Stiff interfacing, felt, or thin EVA foam to reinforce the bottom; fabric glue (for the no-sew version).
Guide Measurements
For the “bag”: Cut a 22 x 30 cm rectangle from the jeans with the pocket in the center.
(Adjust if your phone is larger: the width should be ~3 cm larger than the width of the device.)
How to Make
Cut the Main Panel
Open the pants and cut a 22 x 30 cm rectangle using the entire pocket and surrounding fabric. The pocket will be the decorated “front.”
(Optional) Reinforce
On the wrong side, place a piece of felt/EVA or interfacing in the lower center (where the phone rests). Secure with a few stitches or fabric glue.
Form the Bag
Fold the rectangle in half, right sides together (the pocket will be on the inside). Sew the two sides and the bottom with a 1 cm margin. Trim the corners well.
Turn right side out.
Make the Top Hem
Fold inward 1 cm around the opening of the bag and topstitch to finish.
Prepare the strap
Cut a 18–22 cm strip. Fold the edges inward and topstitch (or use a pre-made waistband). The strap needs to form a loop that fits over the charger and stays secure when plugged in.
Sew the strap
Place the ends of the strap on the back of the bag, very close to the top edge, aligned with the corners. Sew a rectangle with an “X” on each end to secure it.
Tip: Test it in the outlet before final sewing to determine the best loop length.
Finishings
Clean up loose threads, reinforce seams, and test it with the phone inside. If desired, add a mini snap button or Velcro to the top for added security.
Seamless version (optional)
Use fabric glue to close the sides/bottom (press firmly and let dry, as per the manufacturer’s instructions).
For the strap, glue the ends to a denim and EVA foam sandwich, increasing the glued area.
How to use
Put the strap behind the charger (the “brick”).
Plug the charger into the outlet: the strap is secured between the outlet and the charger.
Place your phone and cable inside the pouch.
Why is it useful?
Organized: No more cell phones on the floor or resting on improvised surfaces.
Protection: Reduces the risk of drops and someone stepping on the device.
Mobility: Great for travel or environments with few supporting surfaces.
Sustainable: Repurpose jeans and give an old piece a new look.
Tips and variations
Use the back pocket with the original stitching exposed for a “classic denim” look.
Make different sizes for power banks or headphones.
Add lining (a rectangle of cotton of the same size) before closing the sides for a neat interior finish.
Add an eyelet at the top and use a hook to hang it on a coat rack.
Customize with patches, embroidery, or a handmade label.
Safety Precautions
Use with sturdy, high-mounted outlets; keep away from children and animals.
Do not completely cover the charger; allow ventilation to prevent overheating.
Avoid using near sinks or damp areas.


