Crochet Log Cabin Blanket Pattern
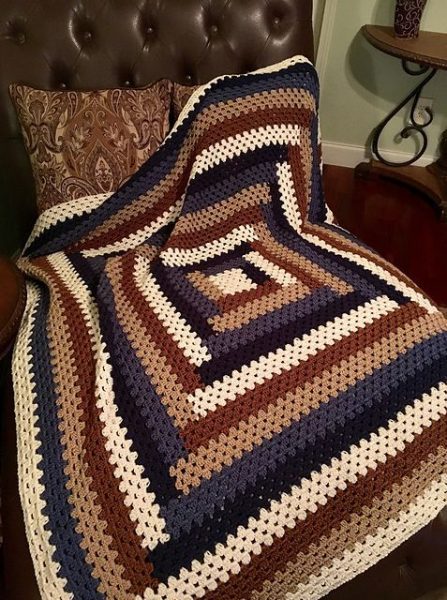
A Crochet Log Cabin Blanket is a timeless and beautiful project that combines the warmth of traditional quilting with the comfort of crochet. Inspired by the classic log cabin quilt design, this blanket creates a cozy and inviting addition to any home. The pattern is customizable in size and color, making it perfect for a variety of decor styles. Here’s how to create your own log cabin crochet blanket step-by-step.
Materials Needed:
- Yarn: Choose worsted-weight yarn in multiple colors. For a classic look, use neutral tones for the background with a mix of accent colors. You’ll need approximately 1500-2000 yards total, depending on the size of your blanket.
- Crochet Hook: Size H-8 (5.0mm) or size recommended on the yarn label.
- Scissors: For cutting yarn.
- Tapestry Needle: For weaving in the ends.
- Measuring Tape: To ensure your blanket is the desired size.
- Optional: Stitch markers to help keep track of your rows.
Abbreviations Used:
- ch = chain
- sc = single crochet
- dc = double crochet
- sl st = slip stitch
- st = stitch
- inc = increase (two stitches in one stitch)
Pattern Instructions:
Step 1: Create the Center Square
- Ch 4 and join with a sl st to form a ring.
- Round 1: Ch 3 (counts as 1 dc), 11 dc into the ring. Join with a sl st to the top of the ch-3. (Total of 12 dc)
- Round 2: Ch 3, dc in the same st, 2 dc in each st around. Join with a sl st to the top of the ch-3. (Total of 24 dc)
Step 2: Build the First Log Around the Center
- Round 3: Ch 1, sc in each dc around, working into the spaces between each cluster of dc. Join with a sl st to the first sc. (24 sc)
- Round 4: Change to your next color and ch 3. Dc in the same st and in each st around. Join with a sl st. (24 dc)
Step 3: Continue Adding Logs
- Round 5 and Beyond: Repeat Round 4, increasing by 12 stitches each round to form an expanding spiral. For each new “log,” use a new color or alternate colors to create a striped pattern. Each subsequent round should have 12 more dc than the previous round. Continue until your blanket is the desired size.
- Tip: To maintain the log cabin effect, always work on the “front” of the blanket. For a more visually appealing result, use contrast colors to create a clear distinction between each log.
Step 4: Final Edging
- Border Row 1: With your last color, sc evenly around the entire blanket. Make 3 sc in each corner to keep the blanket flat. Join with a sl st to the first sc.
- Border Row 2: Ch 1, hdc in each sc across to the next corner, 3 hdc in the corner. Repeat around the entire blanket. Join and fasten off.
Customization Ideas:
- Size Adjustments: Add more rounds to make the blanket larger or reduce the number of rounds for a smaller throw.
- Color Schemes: Use a single color for a more minimalist look or experiment with bright, contrasting colors for a bold statement piece.
- Textures: Add a textured effect by incorporating stitches like puff stitches or bobbles in some rounds for a more decorative finish.
Tips for Success:
- Consistent Tension: Maintain a consistent tension to keep your blanket even and avoid puckering.
- Planning Your Color Pattern: Before you begin, plan out your color scheme to visualize how the logs will look when the blanket is complete.
- Weaving in Ends: Be sure to weave in your yarn ends as you go to save time at the end.
Final Thoughts:
The Crochet Log Cabin Blanket is not only a beautiful addition to your home but also a fun and rewarding project that allows for plenty of creative expression. Whether you choose classic neutral tones or bold, vibrant colors, this blanket is sure to become a cherished part of your family’s winter collection. Enjoy the process, and happy crocheting!