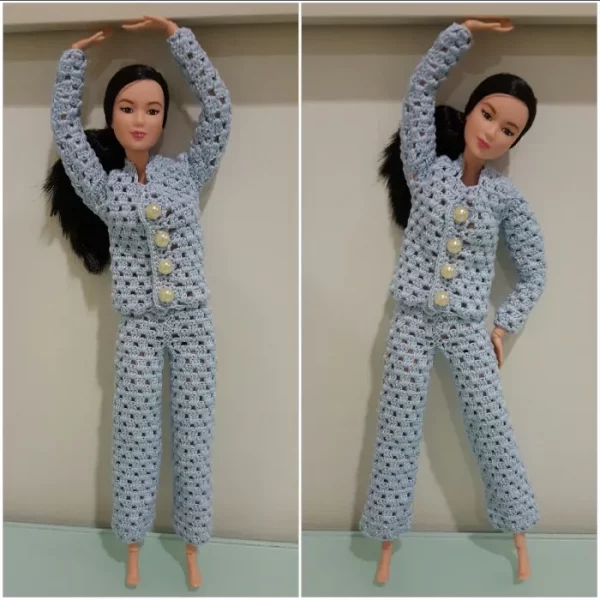
Crochet a Barbie Pajama Set: Free Pattern Guide
Barbie’s wardrobe doesn’t have to be limited to elegant gowns and stylish dresses — cozy, comfortable sleepwear is just as important for a well-rounded doll wardrobe. A crocheted pajama set is the perfect project for adding something unique and practical to Barbie’s collection. This free pattern will guide you through creating a charming pajama set, complete with a top and matching bottoms that are comfortable, cute, and sure to make Barbie feel ready for a good night’s sleep.
Why Crochet a Barbie Pajama Set?
- Cozy and Functional: Pajamas are an essential part of any doll’s wardrobe, offering a relaxed look for Barbie’s downtime.
- Customizable Design: Add your favorite colors and choose the stitch patterns that suit your taste.
- Quick and Fun: This project is simple and perfect for crafters of all skill levels. It’s a great way to practice basic crochet techniques while creating something practical and stylish.
- Perfect Gift: Handcrafted clothes make excellent gifts for young children who love playing with their Barbie dolls.
Materials You’ll Need:
- Yarn: Lightweight yarn such as sport weight or DK (double knitting) yarn works best. Cotton or acrylic yarn is ideal for a comfortable feel.
- Crochet Hook: Use a small hook size, typically between 2mm and 3mm (sizes B/1 to C/2).
- Measuring Tape: To take measurements and ensure a perfect fit for Barbie.
- Scissors: For cutting yarn when finished.
- Yarn Needle: To weave in the loose ends.
- Stitch Markers (optional): Helpful for tracking rounds and stitch placement.
Part 1: Crocheting the Pajama Top
Step 1: Measure Barbie’s Bust and Waist
- Use a measuring tape to measure Barbie’s bust and waist. This will help ensure that the pajama top fits snugly and comfortably.
Step 2: Create the Foundation Chain
- Chain a number of stitches that matches Barbie’s bust measurement. Join with a slip stitch to form a circle, making sure not to twist it.
Step 3: Crochet the Body of the Top
- Round 1: Chain 3 (counts as the first double crochet) and work double crochet stitches (dc) around the foundation chain. Join with a slip stitch at the top of the chain-3 to close the round.
- Subsequent Rounds: Continue working in the round, increasing as necessary to shape the top to Barbie’s body. Increase by working 2 dc stitches into every 4th or 5th stitch, adjusting for fit.
- Length of the Top: Continue until the top reaches just below Barbie’s bust or to your desired length.
Step 4: Add Sleeves (Optional)
- For a sleeveless top, skip this step. For short sleeves, attach the yarn at the desired starting point and work a few rows of single crochet or half double crochet stitches in the round to create sleeves.
- Use a stitch marker to indicate the start of each round to help keep your sleeves even.
Step 5: Create the Neckline
- Use single crochet or slip stitches around the neckline for a clean finish. You can also add a row of picot stitches or shell stitches for a decorative touch.
Part 2: Crocheting the Pajama Bottoms
Step 1: Create the Foundation Chain
- Chain a number of stitches that matches Barbie’s waist measurement, plus a few extra stitches for ease. Join with a slip stitch to create a circle.
Step 2: Crochet the Waistband
- Round 1: Chain 3 and work double crochet stitches around the foundation chain. Join with a slip stitch at the top of the chain-3.
- Subsequent Rounds: Continue working in rounds, increasing or decreasing as necessary for a snug but comfortable fit at Barbie’s waist. For a more elastic waistband, you can use a stretchy stitch like half double crochet.
Step 3: Create the Legs of the Pajama Bottoms
- Work in the round using double crochet or half double crochet stitches, gradually increasing to create a slight flare for a comfortable pajama fit.
- Length of the Legs: Continue crocheting until the pajama bottoms reach the desired length, whether short or long.
Step 4: Add Cuffs (Optional)
- For a more finished look, add a row of single crochet stitches at the bottom of each leg to create a cuff.
Part 3: Finishing Touches
Step 1: Weave in the Ends
- Use a yarn needle to weave in any loose ends securely within the stitches.
Step 2: Attach the Top and Bottom (Optional)
- If you’d like to create a matching two-piece pajama set, simply pair the top and bottom together. You can add a small button or crochet a chain belt to tie the top and bottoms together for a cohesive look.
Customization and Styling Tips:
- Color Variations: Use different colors for the top and bottoms to create a contrast or opt for a matching set for a classic look.
- Decorative Stitching: Add lace, picot, or shell stitch edges to the sleeves, neckline, or leg cuffs for extra flair.
- Pattern Mixing: Experiment with simple stitch patterns, like shells or granny squares, for added texture.
- Embellishments: Add small crochet flowers, buttons, or even tiny crochet bows to give the pajamas a playful touch.
Troubleshooting and Tips:
- Fit Adjustments: If the top or bottoms are too tight or loose, adjust the number of stitches in the foundation chain or modify the number of increases and decreases.
- Neckline Support: To keep the top in place and prevent it from slipping down, consider adding a row of slip stitches around the neckline or using a tighter stitch.
- Even Stitches: Ensure that your stitches are consistent for a professional-looking result.
Conclusion
Crocheting a pajama set for Barbie is a delightful and rewarding project that brings a touch of creativity and comfort to her wardrobe. With a few simple steps, you can create a cozy, handmade sleepwear set that Barbie will love. Enjoy the process, personalize your design with different colors and embellishments, and have fun adding this charming set to your doll’s collection!
FREE PATTERN HERE

Compartilhe com os amigos

